Showing posts with label Non-Vegetarian. Show all posts

Sunday, May 4, 2014

Chicken Enchiladas


Feliz Cinco De Mayo amigos! Make and enjoy some of these enchiladas tomorrow. If you are meatless on Monday, you can always skip the chicken. It's very easy to put together and very very filling. Feliz word always reminds me of my amigo Julia. She is no more, but her memories are here for me to cherish. She had a beautiful soul. She was the one who introduced to me loads of Mexican dishes and festivities.

I love Mexican food since it's spicy like Indian cuisine. And also most of them are pretty easy to put together. Indian cuisine we serve roti/ tortilla separately and in Mexican tortillas used in different ways to hold, roll the vegetables and cheeses inside/ top. :o)


Ingredients:
Cooked Chicken (optional) - 1 Cup
Chopped Onion - 1/2 Cup
Cubed bell peppers - 1/2 Cup
Sweet Corn kernels - 1 Cup
Black\ Pinto or Soya Beans - 1/2 Cup
Jalapeno Peppers - 2 (finely chopped)
Tortillas - 8
Salsa - 1 to 1 1/2 Cup
Shredded Cheese - 2 Cups
Olive Oil - 1 tsp.
Salt - 1/2 tsp.
Coriander leaves to sprinkle on top.


Method of Preparation:
~ In a wide pan heat oil. Add onion and bell peppers. Add a pinch of salt and saute on high until onion becomes tender.
~ Now add corn and jalapeno peppers.
~ If you are using canned beans, strain the liquid and wash them thoroughly under running water.
~ Add in the beans and continue to cook. Once everything is thoroughly mixed, adjust the salt and remove from heat.
~ Preheat the oven to 375 degrees.
~ Once the mixture is cooled a little, divide them into eight equal parts. Put it right in the center line of tortilla and roll them up.
~ Spray a baking dish lightly and place the rolled up tortillas. Bake for 15 minutes.
~ Take them out, top it with salsa and cheese. Again bake for another 7 to 10 minutes.
~ Serve it hot with a side of guacamole and extra salsa.


You might also be interested in:
Guacamole
Grilled Corn Salsa
Pineapple Salsa
Vegetable Quesadillas

Linking this recipe to
HearthAndSoulBlogHopProjectInspiredTurnItUpTuesdayAnythingGoesRecipeOfTheWeekShareYourStuffCreativeCornerDareToShareTryANewRecipeBragAboutItDIYSundayFoodFridayFavoriteThingsFridayFrenzyHappinessIsHomemadeWeekendRetreatShareItSundayMeltInYourMouthMondayWhat'dYouDoThisWeekendMuchAdoAboutMonday,

Wednesday, April 16, 2014

Skinny Avocado Chicken Salad


Who wouldn't love a good chicken salad! And if it's light and fresh, all the more better right. The recipe doesn't use any mayonnaise in it. Avocado gives the nutrient while keeping the bad fat out of the equation. I buy a bagful of avocados, usually containing about 6, take one or two out and leave the rest in the refrigerator. This way all of them don't ripe at the same time. My kids don't really enjoy guacamole, which is my hubby's and my favorite. We both can sit and gorge on it. For the nutrient sake, I try to hide them in many forms. Especially one of my kids favorite curry base is avocado. Shhhh... don't tell them, they love it since it has paneer (cottage cheese) in it. I will post that recipe sometime soon.

Another exception is this chicken salad. They simply love them in wraps. Though several times they mention that they don't really like avocado, they always manage to finish them. It hardly takes few minutes to put together if you have cooked chicken ready. So it's easy lunch box idea. They do stay green for few hours, and then starts to darken a little. Here is how to make this delicious, healthy chicken salad.

Prep Time: 15 min | Cooking Time: 15 min | Serves: 4


Ingredients:
Chicken - 2 (boneless, skinless chicken breasts)
Avocado - 1 (ripened)
Onion - 1/2 Cup Chopped fine
Red Bell Pepper (optional) - 1/ 4 Cup Chopped fine
Cucumber (optional) - 1/4 Cup Chopped fine
Lime juice - 1 tbsp.
Cilantro/ Coriander Leaves - handful (cleaned and chopped)
Salt and Pepper - to taste.


Method of Preparation:

~ Cook chicken breast until done. Let it cool and then shred.
~ Mash Avocado in a bowl and mix with all other ingredients.
~ Finally mix with chicken, adjust salt and pepper and place it in the refrigerator to chill for atleast half an hour.


You might also be interested in these Avocado recipes -
Guacamole
Corn & Potato Stuffed Sandwiches
Banana Avocado Breakfast Smoothie
Avocado & Bell pepper Muhammara

Linking this recipe to Sending this to
Hearth And Soul Blog Hop ProjectInspiredTurnItUpTuesdayAnythingGoesRecipeOfTheWeekShareYourStuffCreativeCornerDareToShareTryANewRecipeBragAboutItFoodFridayFavoriteThingsFridayFrenzyHappinessIsHomemadeWeekendRetreatShareItSundayMeltInYourMouthMondayWhat'dYouDoThisWeekendMuchAdoAboutMondayTuesdayTalent

Sunday, April 6, 2014

Mackerel Fish Curry/ Bangda Thaiphal Ambat


I love seafood. And out of all the fishes, I am crazy about mackerel or bangda as we call it. The curry or the fry any way you make it, you will win me over. In US it's very hard to find; forget fresh, even good mackerel. Since I don't take chances with seafood, I never bought after first try.

Recently we found a place that sells good quality mackerel. And I called my second sister for help. She is VERY good at making seafood, infact non-vegetarian. I love almost all of her preparations. Whenever I am at her place, she spoils us good with loads of non-vegetarian food. This is her recipe that I am holding on to now to make the bangda curry every time.:o)

Thaiphal/ Teppal is less known spice which is used in Konkani dishes. It has pretty strong taste. I don't grind it into the curry, but put it later, it makes it infuse the curry with nice Teppal aroma. You can always skip this in the curry.  To know more about Teppal, visit this link here.

Ingredients:

Mackerel - 2 large (Cut into about 10 pieces)
Coconut - 2 1/2 Cups
Coriander seeds - 1 tbsp.
Chili - Around 8 to 10
Haldi/ Turmeric - 1/2 tsp.
Tamarind - 1 1/2 tsp.
ginger - 1 inch
garlic - 2 or 3
Thaiphal/ Teppal - 5 or 6
Salt


Method of Preparation:

~ Clean and wash mackerel and keep aside.
~ Grind coconut, coriander seeds, chilies, turmeric powder and tamarind together.
~ When its almost grounded, add  ginger, garlic and continue to grind it fine.
~ In a wide thick bottomed pan, bring the ground masala to boil with salt and thaipal.
~ Add fish, cover 3/4th the pan and bring to boil again.
~ Serve it warm, at least after an hour so that the fish soaks in the flavors, along with rice.

Sending this to  Hearth And Soul Blog HopProjectInspiredTurnItUpTuesdayIn&OutOfTheKitchenAnythingGoesRecipeOfTheWeekShareYourStuffCreativeCornerDareToShareTryANewRecipeHeartsForHomeDIYSundayBragAboutItFoodFridayPinWorthyProjectsSweet&SavoryTheYuckStopsHere

Thursday, March 20, 2014

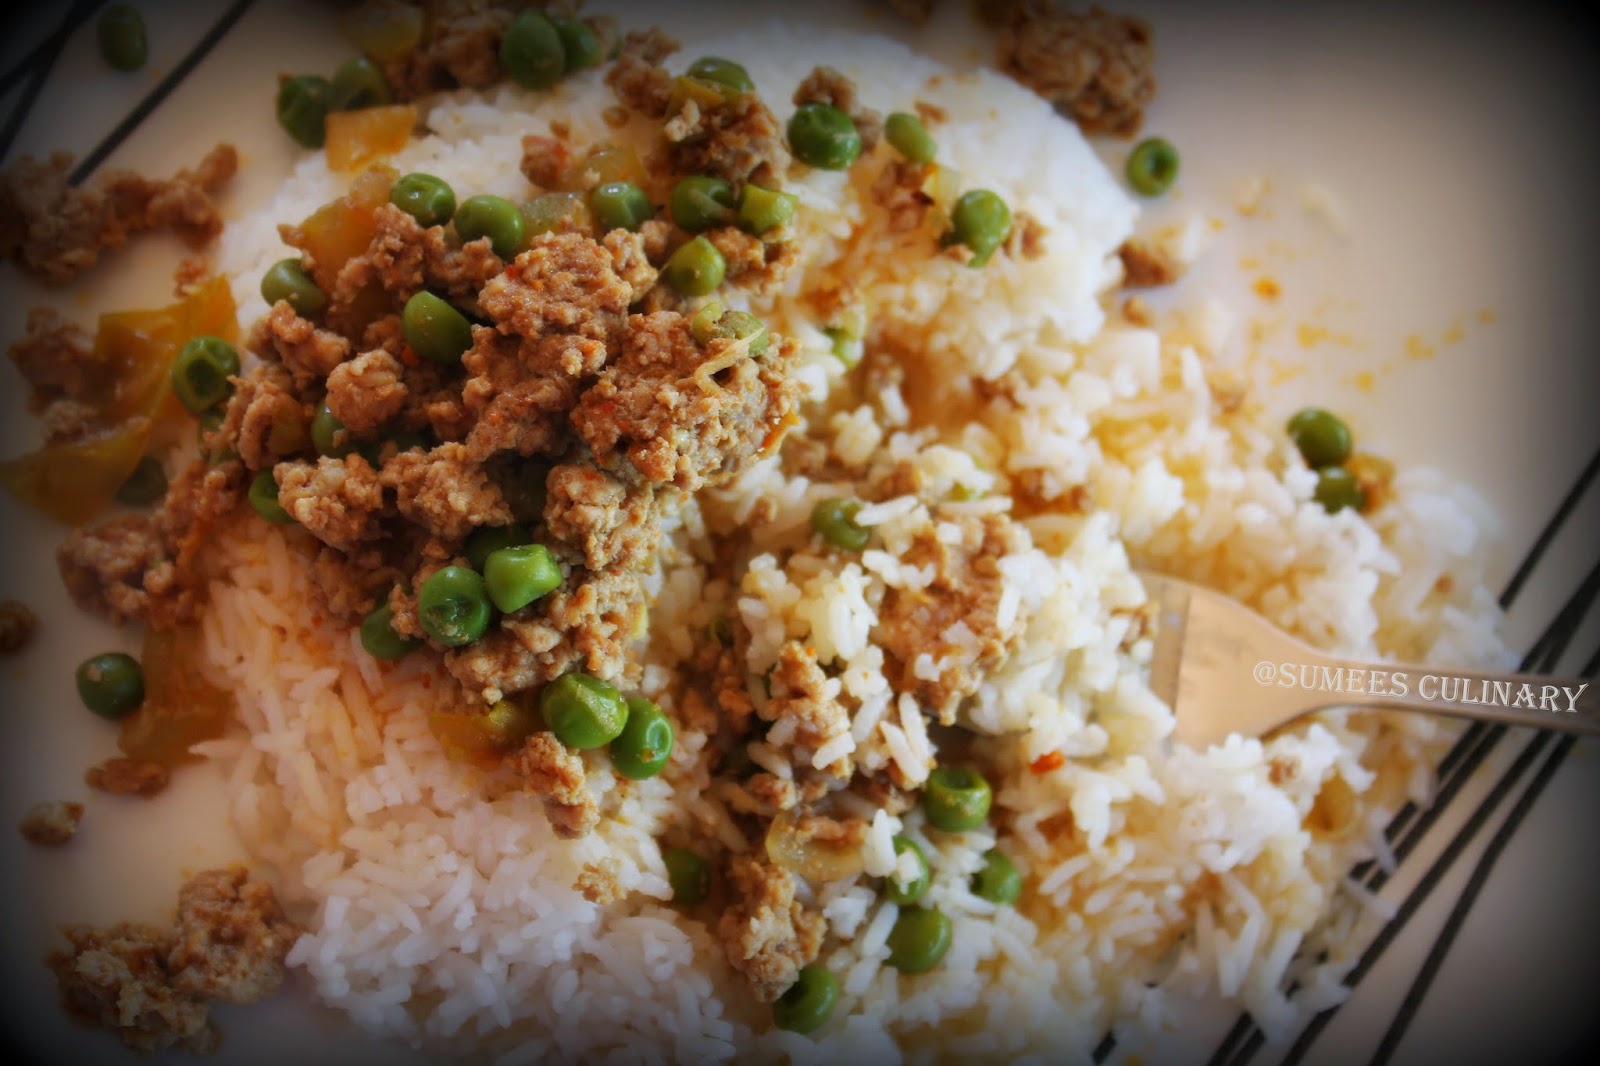
Kheema Pulav/ Aromatic Rice with Ground meat


One of the easiest and quickest pulav/ Pilaf that I make. My kids LOVE it. I make this often when I have ground meat and craving for some carb. It makes a nice lunchbox recipe for kids. Here I took pictures before I mixed the rice and the kheema. Often, I mix them up and serve it to kids.

Prep Time: 5 min | Cooking Time: 15 min | Serves : 4

Ingredients:

Chicken Kheema/ Ground Meat - 1 lb/ 500 gm
Frozen Peas - 1 Cup
Chili Powder - 2 tsp.
Turmeric Powder - 1/2 tsp.
Ginger paste - 1 tsp.
Garlic - 4 to 5 cloves, chopped fine
Onion - 1 small, cut fine
Tomato - 1 medium, cut fine
Oil - 1 tbsp.
Salt - 1 tsp.
Lime Juice - 1 tsp.

For Rice:
Sona Masoori Rice - 1 Cup
Oil - 1 tsp.
Lime Juice - 1 tsp.

Method of Preparation:
~ Prepare Rice with oil and lime juice while cooking. Once done, keep it aside.
~ In a wide pan, saute onion and garlic in the oil.
~ Add tomato, ginger, turmeric and chili powder. Fry until the raw smell of tomatoes is gone, about 3 minutes.
~ Now add the ground meat and fry until they are cooked through. There shouldn't be any pink meat left.
~ Thaw frozen peas in microwave for 3 minutes and add it to the kheema.
~ Add salt to taste and a tsp of lime juice. Mix them well and top it on cooked rice. Serve hot.


Sending this to  Hearth And Soul Blog Hop Favorites event @MaNiche, ProjectInspired, TurnItUpTuesday, TastyTuesdayChefInTrainingIn&OutOfTheKitchen, AnythingGoes, RecipeOfTheWeekDoTellTuesday, ShareYourStuff, CreativePartyCreativeCorner, DareToShareTryANewRecipe, BragAboutIt, MaMade, FoodFriday, PinWorthyProjects, Sweet&SavoryFavoriteThings, ShineASpotlight, Showlicious, SaturdayNightFever, HappinessIsHomemade, ShareItSunday, MeltInYourMouthMonday, What'dYouDoThisWeekend, MuchAdoAboutMonday

Sunday, March 2, 2014

Hearty Chipotle Chicken Soup/ Chipotle Chicken Chili


First time when I made this soup, I wasn't really thinking about what I was doing. But it turned out really really good. Luckily I remembered what all I did and immediately noted the recipe. My kiddos say that "this is the BEST soup you have ever made". Same exact words from their mouth every time I make it. It's a complete meal by itself, with beans, rice and chicken, this soup fills you up. It's very versatile and you can play with different vegetables and meats. Pictured here, I have paired it with my Cranberry Pecan Kale Salad.

Prep Time: 40 min| Cooking Time: 40 min | Serves: 5

Ingredients:

Shredded Chicken * - 1 Cup
Olive Oil - 1 tbsp.Onion - 1 Medium - Cubed
Garlic - 4 Cloves (Crushed)
Bell Pepper - 1 Medium - Cubed
Brown Rice (Cooked) - 1 Cup
Pinto Beans - 1 Can
Vegetable/ Chicken Stock - 2 Cups
Water - 2 Cups
Lime Juice - From half of lime ( About 1 tbsp)
Cilantro (optional) - handful
Salt - 1 tsp. *Careful with quantity, if using stock

For Chipotle Sauce:
Ground Chipotle Chile - 1 tsp. (or 2 chopped Chipotle Chile from can)
Chili Powder - 1 tsp.
Brown Sugar - 1 tsp.
Tabasco Sauce - 1 tsp.
Ketchup/ Tomato Sauce - 1 tbsp.
Paprika - 1 tsp.
White Vinegar - 1 tsp. (optional)


Method of Preparation:

~ For shredded chicken below are various methods to do
1. Boil 4 cups of water and add uncooked chicken. Once they are cooked completely (after 15 min), fish out the chicken and let it cool. You can use this water for soup. Shred the chicken once you are able to handle it.
2. Canned Cooked Chicken in water. Shred them and use.
3. You can always use left over chicken from any dish you have prepared.

~ Prepare the brown rice ahead of time and keep it handy.
~ Mix all the ingredients under chipotle sauce in a small bowl and keep it aside.
~ In a large stock pot, heat olive oil and add onion, bell pepper and crushed garlic.
~ Fry until onion are opaque. Add the chipotle sauce and continue to fry until the raw swell goes away.
~ Drain the water from pinto beans and add it to the pot along with water and chicken stock.
~ Bring it to boil, add brown rice, cover and simmer on low heat for 5 minutes.
~ Check for salt and add as needed. Top it with lime juice, cilantro and serve it hot.


Note: You can substitute chicken for fresh soy meat or skip the meat altogether.

You might also be interested in:
Cranberry Pecan Kale Salad
Vegetarian Chili
Brunswick Chicken Stew
Thai Basil Chicken
Turkey Ragu

Saturday, February 1, 2014

Chicken Kabob Bites


These Chicken Kabob Bites are very easy compared to any appetizers I make in terms of cooking method and time. But my only complain about this is when I really have to make those little balls of the chicken mixture. It takes easily about 15 to 20 minutes. Still nothing compared to some of the other appetizers right. To top it, not only it's protein packed, it has hidden goodies.

I came up with these little kabob bites a while ago, when experimenting with what all dishes I could come out with ground chicken. My kids literally live on this one dish if they could. Even when I make these for parties or families who come over, most of them fill themselves with this. So whenever I plan on having kabob bites for appetizer, I tend to keep rest of the menu very simple. Because there will be not many takers. And whoever had asked if this recipe was on my blog, I would wonder why haven't I put it up for so long. Even when I tell them the recipe they wanted me to put it up on the blog to share their love for these. I at last overcame from pure laziness of clicking pictures and eventually here it is.


Prep Time: 30 min | Cooking Time: 10 min *

Ingredients:

Ground Chicken - 1 pound (About 1/2 kg)
Grated Zuchini/ Carrot - 1 Cup
Spinach (or any greens) - 1 Cup (Chopped fine)
Bread Crumbs - 1 cup bread crumbs
Egg - 2 large
Parsley/ Coriander leaves - 1/2 cup chopped
Shredded cheese - 3/4 cup
Chili Powder - 1 tsp.
Ginger - 1 lemon size, grated
Garlic - 3 pods - grated
Salt to taste

Method of Preparation:

~ In a wide mixing bowl, mix all the ingredients except ground meat.
~ Lastly add chicken and GENTLY combine the mixture.
~ Line two baking sheets with foil and spray them.
~ Now make small balls of the mixture (gently please) and arrange them with an inch of distance, on the foil.
~ Broil** them for 10 minutes, turning them once in-between. Time depends upon how close or far you are from broiler. I keep it at first level
~ Serve them with once hot sauce/ ketchup/ green chutney.


Note:
~ Do not add meat until all other ingredients are combined. Mix only until combine once meat is added. That's the secret to getting juicy meatballs.
~ Any other kind of ground meat can be used. I often use lean turkey meat.
~ * Cooking time is dependent upon the size of the meat balls.
~ ** If you don't have oven with broiler, you can always pan fry these.

Wednesday, December 18, 2013

Seekh Kabab (Oven Baked)


If you love Seekh Kabab put your hands up. Yeah I know all the hands went up, atleast here in my household. It's very simple to make. Don't be scared because it's one of the exotic dishes. Julia Child once famously said, “The only real stumbling block is fear of failure. In cooking you’ve got to have a what-the-hell attitude.” So go for it.
We love the skewered chicken dishes. My kiddos can survive only on this for days. I just add a side salad and some flavored rice. Using the oven allows me to use lesser oil (rather hardly any except what you spray on the tray actually.) So get your oven on and create your magic to impress your loved ones.

Prep Time: 25 min | Cooking Time: 15 min | Total Time: 1 Hr. 45 min. | Makes: 4 large skewers

Ingredients:

Ground Meat (Chicken/ Lamb/ Turkey) - 1 lb *
Onion - 1 large
Carrot - 1 large (Optional)
Ginger - 1 lime size
Garlic - 4 large pods
Coriander leaves - handful
Green Chilies - 2
Sauf/ Fennel Seeds - 2 tsp.
Chili Powder - 2 tsp.
Coriander Powder - 2 tsp.
Garam Masala - 1 tsp.
Salt - 2 tsp.
Meat Skewers - 4 **

Method of Preparation:

~ In a large bowl, grate Onions, Carrots, Ginger and Garlic. Add in finely chopped Green chilies and Coriander leaves.
~ In a mortar, coarsely ground Fennel seeds and add it to the mixture.
~ Add in Chili Powder, Coriander Powder and Garam Masala.
~ Mix all this using hands and add Ground meat and salt. Gently mix them all until combined. Cover this with a plastic wrap and leave it in the refrigerator for an hour.
~ Line a oven safe sheet with a foil. Spray evenly using canola oil/ olive oil spray.
~ Divide the mixture into four equal parts. Now take one portion and form it into a long sausage like kebab while pressing onto the skewer. Do this until the meat is on the skewer. Place it on the prepared sheet.
~ Continue to do the remaining skewers and arrange them on the cooking sheet.
~ Switch on the Broil button on your oven, place the cooking sheet on the highest rack. Broil for 7 minutes. Take it out of the oven and turn the skewers. Put them back into the oven and broil for another 7 minutes. ***
~ Once cooled enough to handle, pull out the Kebab's out of the skewers. Cut them in 4 pieces and serve drizzled with some lemon and cut onions.


Note:

* This can easily turned into a Vegetarian Seekh Kabab. Use fresh Soy meat instead of the ground meat
** You can use bamboo skewers for the purpose. First make sure to soak it in the water for atleast an hour, so that it won't burn out in the oven. Also you might have to use 6 to 8 skewers instead, since they are much smaller in size.
*** To broil you don't have to preheat. Keep an eye on the broiler to make sure your highest rack is not too close to the source of heat. You then run into the risk of burning the kebabs rather than cooking. If you see it's getting burned, remove the sheet from highest rack to middle rack. Place the Kebabs back at the high rack for only last minute of cooking to get nice browned effect.
~ This turns out really great with any kind of ground meat. But Lamb is one of the best. Turkey is good for having lean meat.
~ I usually add carrots, zucchini or any greens while making these, so it adds extra nourishment to our daily diet. You can totally skip this part.
~ Once you add the meat in while mixing, make sure you are handling it gently. Otherwise the end product will become dry.

Wednesday, December 4, 2013

Sardines in Spicy Tomato Sauce/ Tarli Phanna Upkari


I remember in my summer vacation when we used to visit my maternal grandma, she would keep tarli prepared in a small earthen pot. The more days you keep the tastier it would become. It's almost like pickle, when you think of it, it makes your mouth water. It's spicy and tangy. One of the dish that my mom prepares well too. I was always apprehensive of preparing the authentic tarli sol or upkari. This particular dish is courtesy of my friend Shubhi. One day she prepared this right in front of my eyes and I couldn't believe how good it was. It didn't needed an earthen pot (am sure that will enhance the taste though), nor needed to sit longer to taste better. This Sardines dish has become one of mine and my DH's favorite, and can be prepared in jiffy.

Prep Time: 2 min. | Cooking Time: 15 min | Serves: 6

Recipe Source: Shubhangi
Ingredients:
Sardine - 1 can (Sardines in Tomato sauce)
Tomato Sauce - 1 Can (or Tomato Juice)
Oil - 1 tsp.
Mustard - 1/2 tsp.
Hing/ Asafeotida - 1/2 tsp.
Chili Powder - 1 tbsp. *
Salt - 1 tsp.
Sugar - 1/2 tsp.


Method of Preparation:

~ In a thick iron cast pan heat oil and add mustard seeds.
~ When the mustard starts crackling, add hing and fry for few seconds.
~ Now add chili powder, tomato sauce and sardines.
~ Bring everything to boil, add salt and sugar, mix it all gently.
~ Simmer for couple of minutes and take it out of heat.
~ It goes really well with just plain rice.


NOTE:
~ Chili should be added according to your spice level. It has to be little spicier.
~ Instead of tomato sauce you could use V8 tomato juice. Just hold the sugar.
~ Check on the salt since canned sardines and tomato sauce has some salt in it.

Wednesday, October 2, 2013

Baked Whole Black Pomfret


Baking is like therapy. And when it's fish that's baking then it's Nirvaana! Yes. I love baked fish and I do it many times. Why baking you ask? Let's look at some of the pros. I don't have to baby sit, uses way less oil than pan fried and tastes juicier. Long time back when I first baked, my son, who was a little toddler and my DH sat around and just devoured the fish. I was really amused by my little ones love for the fish. Bake or no bake he never faltered on that tradition of sitting with Dad and eating that first before anything else. As he is getting older he wants me to bake it more than pan frying it. So here is our favorite recipe of mine.

Prep Time: 20 min | Marinating Time: 1 Hr or more | Cooking Time : 30 ~ 35 minutes* | Serves : 4

Ingredients:

Black Pomfret/ Paplet - 4
Chili Powder - 2 tbsp.
Turmeric Powder - 1/2 tsp.
Tamarind Concentrate - 1 tbsp.
Ginger - small lime size
Garlic - 7 big cloves
Garam Masala Powder - 1/2 tsp.
Salt - 2 tsp.


Method of Preparation:

~ In a small bowl, grate ginger and garlic. Add everything else but fish, in the ingredient list and mix thoroughly to make a paste and keep it aside.
~ Cut the tail and fins off of the fish. Make a slit near the stomach and clean out everything from inside the stomach. Wash all the fish thoroughly with running water.
~ On each side of the fish, make two slits.
~ Rub the prepared paste onto the fish and inside the hollow stomach area.
~ Cover and let the fish marinate for atleast an hour. (More the better :o)). If you are planning to marinate for more, leave it in the refrigerator.
~ When ready to bake, take out the fish if it's in refrigerator. Preheat the oven to 300 deg Fahrenheit.
~ On a baking sheet, cover with a foil and spray with a non-sticking spray. Line the fish on the sheet and spray again.
~ Stick it in the oven and bake for 30 to 40 minutes. Half way through at around 20 minutes, flip the fish and continue to bake until a light crust forms on top of the fish.
~ Squeeze some lemon and serve them hot. Meat just slides off the bones if you want to serve in little pieces instead of whole fish.

Best served with some hot rice and Daali Thoy.
* Note that cooking time needs to be increased or decreased depending upon the number of fish. Here I have given approximate time for baking four large fish.

Sending this to Valli's event 'Side Dish Mela'

Thursday, June 14, 2012

Spicy Turkey Kheema Masala/ Ground Meat Dish

I never had tasted Turkey before I came to US. When everyone kept convincing me that it tastes just like chicken, and a lean meat too. So I did give it a try. Cooking with it was not an option coz hubby would turn up nose on it. But eventually since it's easy to get turkey kheema I convinced him one day to buy it. I promised that I would make it so good that he would ask me for seconds.

I kinda followed standard chicken kheema recipe, but with turkey it comes out nice with boiled water. So here is my way of doing kheema. BTW now it's a regular on our shopping list. :o)


Prep Time: 10 min| Cooking Time: 15 min| Serves: 6

Ingredients:

Minced/ Ground Meat/ Kheema – 1 lb.
Minced Onion – 2 cup
Tomato – 2 (finely cubed)
Frozen Green Peas – 1½ cup
Ginger – 6 cloves
Garlic – 1 lemon size, finely chopped.
Turmeric Powder – ½ tsp.
Chili Powder – 3 tsp.
Coriander Powder – 1 tsp.
Curry leaves - 1 sping
Water – 1½ cup
Oil – 2 tsp.
Salt to taste


Method of Preparation:

~ Place frozen peas in a microwaveable bowl, add a tsp of water and cook high for 3 minutes.
~ In a wide pan, heat oil and add onions, tomatoes, ginger and garlic. Fry till onions are translucent.
~ Add turmeric, chili and coriander powder and fry for about half a minute.
~ Add water to the mix and bring it to boil.
~ Now add minced meat, mash with a spatula, or potato masher.
~ Add green peas and curry leaves. Add salt to taste. Cook until meat is done (in about 5 to 10 minutes)
~ Note that depending upon how thick or thin you want your gravy increase or decrease the quantity of water.

Sending this to SYF&HWS Series - Red Chili, brain child of Anu , guest hosted by me all this month.

Thursday, April 26, 2012

Brunswick Chicken Stew

A Chicken stew picture and name caught my attention while I was reading news. When I looked the method it seemed like a one pot meal. This stew is basically meat with lot of vegetables in it. You may say then it is soup, why call it stew. The difference is stew is much thicker than the soup. It's usually eaten with bread or with rice. It's famous in southern part of US. Original recipe called for squirrels or rabbits it seems! :o) From the original recipe I adapted to make it little more Indianized. It turned out great, it's going to be my one pot meal savior! Its power packed with proteins, vitamins and minerals.


Prep Time: 15 min | Cooking Time: 45 min| Serves: 4

Adapted from - My Recipes


Ingredients:
Bell pepper - 1 cup chopped
Onion - 1 cup chopped
Green Spring Onions - 4 springs - Chopped
Olive Oil - 1 tbsp.
All-Purpose Flour - 1 tbsp.
Chicken - 1 lb - cut into 1/2 inch pieces
Water - 2 cups (You can use veggie or chicken broth)
Canned Tomato - 8 oz.
Dried Thyme - 1 tsp.
Chili powder - 2 tsp.
Turmeric Powder - 1/2 tsp.
Garam masala - 1/2 tsp. (substitute with pepper)
Corn - 1 cup (I used Frozen corn, thawed)
Baby Lima Beans - 1 cup (I used Frozen, thawed)
Garlic - 2 cloves (mined)
Lime juice - 1 tsp.
Salt to taste


Method of Preparation:
~ Heat little oil in a wide pan and add bell pepper, stem portion of green onions and onion. Cook for 5 minutes.
~ Clean chicken. Combine flour and chicken in a bowl. Toss it to coat well.
~ Add the remaining oil and chicken to the pan. Roast chicken for 5 minutes until they are lightly browned.
~ Add water or broth and bring it to a boil. The gravy will start thickening. Takes about 15 to 20 minutes
~ Add tomato, thyme, chili powder, turmeric powder and garam masala. Mix them well for a minute.
~ Now add corn, lima beans and garlic. Add salt to taste. Cover and simmer for another 15 minutes.
~ Switch off the heat, add lime juice and top it with remaining green onion spring.
~ Serve it with garlic bread or on top of bed of rice.

Linking this to My Spicy Kitchen's "Chicken Feat" Event

Tuesday, February 7, 2012

Coriander/ Cilantro Chicken

You must be wondering the name says cilantro chicken, but the gravy is red! Well, it the bright color that comes out of tomatoes. Neat isn’t it?  :o)
This post is for monthly blog hopping event and I am paired with Swetha of Our Cherished World for this month. Visit her to find out what she has cooked from my collection. Going through her recipes this coriander prawns recipe caught my attention. I decided to try this with chicken. And boy was I glad to try it. It turned out really nice and tangy with a rich flavor of the curry. It's a must try and will be a sure hit.


Prep Time: 20 mins | Cooking time: 30 to 40 mins | Serves: 6 people

Ingredients:
Chicken - 1 Kg (2.2 lb - Was about 4 cups)

Marinate:
Yogurt – ½ cup
Chili powder - 4 tsp.
Turmeric powder – ½ tsp.
Salt to taste (About 1½  tsp.)

For Curry Paste:
Onion – 1 cup chopped
Tomato – 3 cups chopped
Yogurt – 1 ½ cup
Cashew nuts – 2 tbsp.
Ginger – 1 tbsp. grated
Garlic – About 10 pods
Cinnamon – Small piece
Cloves – 7 to 10
Pepper – 1 tsp.
Fennel seed – 1 tsp.
Cumin/ Jeera seeds – 1tsp.
Green Chilies – 5
Fresh Cilantro/ Coriander leaves – 1 big bunch.


Method of Preparation:
~ Cut and clean chicken. Mix everything under marinate into a paste. Apply to chicken and let it marinate atleast for 2 hours. I marinated overnight.
~ Grind all the ingredients under “For Curry paste”.
~ Heat 1 tbsp. of oil in a pan. Add the masala paste and fry for at-least 15 minutes on medium heat. After raw swell goes and oil starts to separate, simmer on low heat for another 10 minutes.
~ Now add the marinated chicken, increase the heat and mix for about 5 minutes.
~ Cover the pan and continue to cook until chicken is cooked completely. This took about 15 min. Uncover and simmer for another 5 to 10 minutes while stirring.
~ Goes really well with Italian bread, Chapati or rice.


Update: Just thought will add alternative vegetarian option to the list. The gravy itself was so good that it can be used in vegetarian dishes.
~ Potato gravy - Potato is so versatile that it goes well with any gravy that is meant for chicken. My mom would take out the gravy and then add meat in case someone in the house is not going to eat the non-veg dish. She would boil some potatoes and after bringing gravy to good boil, add potatoes and switch off the heat.
~ Bhindi/ Okra - Clean okra, pat dry them. Then fry them in little more oil than usual with little salt. Once half way done add the prepared gravy and bring them to boil.
~ Eggplant/ Bhaingan - Follow instruction as in for Bhindi.
~ Soy Chunks - Wash and soak soy chunks in hot water for 10 mintues. Squeeze out all the water. In a pan fry soy chunks, add gravy and bring them to boil.
Check out my previous blog hop entries

This is off to Radhika’s blog hop event.

And also to Srav's Dish For Loved Ones

Saturday, January 28, 2012

Cheese Egg Omlet

I make this omlet usually for my kids. They love this kind with just ketchup on the side. They are happy with taste and mommy is happy that they had tons of protein and calcium at one go! Here is how I make them.

Prep Time: 2 min | Cooking Time: 5 min | Serves: 1

Ingredients:
Eggs – 2
American Singles Cheese slice – 1
Whole Milk – 1 tbsp.
Garlic - powder/ fresh pod finely chopped – ¼ tsp.
Butter – 1 tsp.
Pepper powder – a pinch
Salt to taste

Method of Preparation
~ Wash eggs and break them into a bowl.
~ Add salt, pepper, garlic powder and milk. Whisk vigorously with mesh whisk or a fork.
~ Once it froths, add cheese bits and mix little.
~ Heat a pan on a low to medium flame. Add butter and pour in the egg mix.
~ Cook on low heat for a minute, then flip it over to cook.
~ Serve it up with ketchup and see how the kiddos gobble them up. :o)

Tuesday, December 13, 2011

Tuna Kabobs

I am in India! Yes! I am sure my four weeks of vacation will zoom past me before I know it. My blog will be put on a slow gear for some time during this period. But nevertheless I wouldn’t have missed my blog hopping for anything. So I have planned ahead for these and here is my bloghopping for the day from Neha’s From My Heart.

Going through her blog, I thought I would try the baking something. Since I have never given bread a try, I zeroed on her banana bread recipe. But since my DH is a big fan of banana walnut bread, I modified it and fell flat on face. I did try a different banana walnut recipe and will be posting that soon. Coming back to blog hop I later tried her Tuna Kabob.  Oh they were just so good. It was very easy to prepare and we couldn’t stop snacking on it. So had to quickly take picture. I had never tried tuna in a kabob style so it was really refreshing.

I mostly stuck to her recipe making very few changes. Since I had made double the quantity of what is mentioned below, we had some leftovers for dinner. I simply heated them up and rolled it inside chapati and voila, kiddie wraps were ready.


Prep Time: 10 min. Cooking Time: About 7 to 10 min for a panful.

Ingredients:

White Tuna in water (no salt) - 1 Can
Onion – small ( about half a cup finely chopped)
Egg - 1
Potato – 1
Chaat Masala – ½ tsp.
Bread Crumbs – ½ cup
Green Chili – 2 (finely chopped)
Cilantro/ Coriander Leaves – handful.
Ginger – Lime size (grated)
Garlic – 3 pods (grated)
Oil to shallow fry
Salt to taste

Method of preparation:

~ In a microwave safe bowl cook potatoes. Grate and place in a mixing bowl.
~ Discard the water in tuna and add to the potatoes.
~ Add all other ingredients except oil and mix well. I used hands to give it a nice mix.
~ Make small patties out of the mixture and shallow fry on both sides.
~ Serve it hot with some green mint chutney and ketchup.


Note: Keep check on salt since tuna tends to be saltier.

Check out my previous blog hop entries

This is off to Radhika’s blog hop event.


Related Posts Plugin for WordPress, Blogger...