Showing posts with label Dessert. Show all posts

Saturday, December 13, 2014

Blackberry Cheesecake


Happy Holidays everyone! Though there was no break from cooking at home, this is the longest I have taken break from blogging I think. But hopefully this cheesecake recipe comes at the right time to make your holidays merrier!

Basic Cheesecake recipe is a combination of various trials that I have done over the years, so do not remember where and how I started making. Though I have BIG fan at my home for this cheesecake. That's my son. He can completely devour the whole cake if I am not looking. For him, where-ever there is cheesecake on the dessert menu, it's the best place to eat.

You can make the cheesecake ahead of time and freeze it. Thaw it in refrigerator overnight and it will be ready to serve next morning.

Prep Time: 20 min| Total Time: 1 Hr + 3 Hr Refrigerate. | Serves: 8 to 10.


Ingredients:

For the Crust:
6 squares of graham
1 tbsp. sugar
pinch of salt
Cinnamon - 1 pinch
butter - 1 tbsp.

For the Filling:
12 oz cream cheese (at room temperature)
Heavy Cream - 1/2 Cup
1/3 Cup Sugar
vanilla - 1 tsp.
Egg (at room temperature) - 1

For Topping:
Blackberry - 2 Cups
Sugar - 1/2 Cup
Water - 1 tbsp.

Method of Preparation:
~ Preheat the oven to 350 deg.
~ Pulse all the ingredients under crust, it will be a crumbled wet sand like mixture.
~ Spray the pie pan with cooking spray. Press the crust mixture into the baking pan. Bake the crust for 7 minutes.
~ Let it cool for 5 min. See how the center sinks, it's perfectly fine. Reduce the oven temperature to 325.


~ Meantime, prepare the filling. In a small bowl, add softened cream cheese. Using a hand mixture, beat at a low speed.
~ Once all the lumps are gone, add heavy cream.
~ Add this cream cheese filling into the baking pan. Bake for 30 min or until center is done.
~ Once it's cooled, refrigerate for atleast 3 hrs.


For Blackberry compote:
~ Rinse blackberries gently. Boil them with sugar and water. Using a potato masher, gently keep mashing. Cook for about 15 minutes.

To serve. top cheesecake with compote and serve


Thursday, February 13, 2014

Chocolate Chip Cookies


Happy Valentines Day Everyone! We are snowed in today. Had more than a foot of snow. And we are expecting more tonight. Spring seems to be too far out! Well to keep the kids busy we did many activities with them. One of them was preparing Valentine's day card for exchange at my son's school. I had gold coin chocolates and wanted to see if we can do something with it. I found this link, about making cute Valentine card and was thrilled coz it was pretty simple. Isn't it neat. So apt for the ongoing Olympic fever going around in his school too.


Anyways, then came the baking part. I prepare these chocolate chip cookies many times, it's very simple, fool proof recipe. It's already there on my blog here. But thought will re-post with some new clicks.

Prep Time: 15 min | Baking Time: About 10 min each batch | Makes: About 3 to 4 dozen.

Ingredients:
Multi-grain Flour + AP-Flour - 2 1/4 Cup
Baking Soda - 1/2 tsp.
Salt - 1/2 tsp.
Unsalted Butter - 1 Cup
Brown Sugar - 1 Cup
White Sugar - 1/2 Cup
Vanilla extract - 1 tbsp.
Eggs - 2
Dark chocolate chips - 1 1/2 to 2 Cup

Method of Preparation:
~ Preheat the oven to 350 deg Fahrenheit.
~ In a small bowl sieve flour, baking soda and salt and keep it aside.
~ In another bowl beat melted butter and sugar until combined.
~ Now add the eggs and vanilla extract, beat until it becomes fluffy.
~ Add the dry ingredients in batches. Do not over mix. Fold in chocolate chips using a spatula.
~ On a cookie sheet, set a parchment paper. Scoop out cookie dough and drop them onto it. Keep them about 2 to 3 inches apart.
~ Bake for 10 minutes, take out leave it for few minutes to cool and then place them on wire rack to cool them completely.


Sunday, December 22, 2013

Red Velvet Crinkle Cookies


Merry Christmas and Happy Holidays everyone! With Christmas eve almost in sight, bake these delicious crinkle cookies for Mr. Kris Kringle. These crinkle cookies sure to impress. I had tried this recipe, cut into half 2 weeks ago. It turned out so good that I decided to make them again. It's not only a feast to your eyes, the subtle hint of cocoa, right amount of sweetness and in between surprises of biting into chocolate morsels makes this a sure winner.

Prep Time: 20 min | Baking Time: 15 mins | Waiting Time: 1 Hr | Makes : About 40

Recipe Courtesy: Cooking Classy
Ingredients:
All Purpose Flour + Multi-grain Flour - 3 cups
Cocoa Powder - 1/4 cup
Salt - 1/2 tsp.
Baking Powder - 2 tsp.
Baking soda - 1/2 tsp.
Softened Butter - 1/2 Cup
Olive Oil - 1/3 Cup
Granulated Sugar - 1 1/3 Cups
Eggs - 3
Buttermilk - 2 tbsp.
Vanilla Essence - 2 tsp.
Red food coloring - 2 tsp.
White Chocolate Morsels - 3/4 Cup
Powdered sugar - 1/2 Cup (To roll the cookies)

Method of Preparation:

~ In a small bowl, mix flour, cocoa powder, salt, baking powder and baking soda and keep it aside.
~ In another large bowl using electric mixer, whip butter, oil and sugar together to form soft peaks.
~ Add in one egg at a time, blending each one into the mixture.
~ Add buttermilk, vanilla essence and the food coloring.
~ Slowly add in the dry flour ingredients and mix until combined.
~ Gently fold in the caramel bites. Cover with a plastic wrap and leave it the fridge for atleast an hour.
~ After you take out the dough out of the refrigerator, pre-heat the oven to 350 deg.
~ Place powdered sugar in a bowl. Scoop out small balls of the dough, shape them and roll them into powdered sugar. Transfer them to parchment lined cookie sheets. Handle them gently, otherwise the powdered sugar won't be visible at the end of baking.
~ Bake for about 12 mins, take it out and cool them on a wire rack. Once cooled store them in air tight container.


Note:
- Baking time depends upon how big the cookies are. I had a size of a medium lime.
- When you take them out, after cooling store them immediately. This is true for all the cookies especially when it's cold outside. They tend harden otherwise.

You might also like Red Velvet Cupcakes

Sending this to Vardhini's Bake Fest event @With A Spin

Wednesday, November 27, 2013

Dry Fruits and Nuts Burfi/ Dates Rolls


Happy Thanksgiving everyone! Busy with prepping, cooking already? I don't have to do much except take a dessert to my friends place where she's hosting Thanksgiving dinner. She asked for brownie, so I will soon be preparing my to go recipe of Double Chocolate Brownie.

My kiddos don't eat nuts except pistachio. If I don't powder it and put it in without their knowledge there is no way I can get them to eat them by themselves. These Dry fruit Rolls though are a hit with my son. He doesn't mind this, even though he can see all the chunks of dry fruits in. I have to admit first time it was hard to get him to have one bite... But after first bite there is no turning back. He usually gobbles down 2 or three. I have cut them in round, but you can always cut it into desired shapes. Try this dessert for the holiday and let the guest marvel over the taste.


Prep Time: 15 min | Cooking Time: 15 min | Makes : About 4 dozen

Ingredients:
Dates - 2 Cups Packed
Almond - 1 Cup
Pistachio - 1 Cup
Cashew Nuts - 1 Cup
Condensed Milk - 1 tbsp.
Ghee - 1 tsp.


Method of Preparation:

~ Pulse almond, pistachio and cashew nuts in a food processor for few seconds. We should have small pieces of it (not powder). Keep them aside.
~ In a thick bottomed vessel, heat ghee and dates. Once it's heated mash it using a potato masher.
~ Add condensed milk and cook for another 5 mins, it starts to come together.
~ Switch off the heat and add all the dry fruits.
~ Mix them together and leave it to cool a little bit.
~ Make roll out of the mixture and wrap it in parchment paper. Leave it in the refrigerator for half an hour, so you can cut them easily.
~ Take it out and cut them into discs. * Before cutting them you can roll them into dehydrogenated coconut flakes. I usually skip if I am leaving it out for long for kids to eat everyday.
~ Store them in an air tight container. They stay good on the counter for 2 to 3 weeks.


Sending these for Hearth and Soul Blog Hop.

Monday, November 18, 2013

Spiced Peach Muffins (Eggless)


Holidays are approaching and every household is preparing for it. My kiddos for their love of fruits want me to use fruits in any recipe. These muffins I baked a while ago. Peaches are still in abundance at grocery stores. If you want to sneak in any fruits in your diet, these are a great way. Put a dab of cream cheese and add a coffee or tea, your scrumptious breakfast treat is ready. :o)

Recipe source - Babble

Prep Time: 15 min | Baking Time: 25 to 30 mins | Makes 12 to 15 muffins


Ingredients:

Multi-grain + Unbleached All-Purpose Flour - 2 Cups
Salt - 1/2 tsp.
Allspice powder - 1/2 tsp.
Ground cinnamon - 1/2 tsp.
Baking powder - 2 tsp.
Brown sugar - 1 Cup
Flaxseed meal - 1 tbsp. *
Oil - 1/2 Cup
Milk - 3/4 Cup
Peaches, diced - 2 Cups
2 tbsp Brown sugar with 1/4 tsp Cinnamon - To sprinkle on top


Method of Preparation:

~ Preheat the oven to 400 deg Fahrenheit. Line muffin pan.
~ Add two tablespoons of warm water to flaxseed meal and set aside. (Note you can replace flaxseed meal with an egg. Then no need of this step. Egg can be beaten and directly added to the mixture.)
~ In a large bowl combine flour, salt, baking powder, brown sugar, allspice and cinnamon.
~ Stir in flaxseed mixture, oil and milk.
~ Once everything is combined, gently stir in diced peaches.
~ Drop big spoonful into the muffin cups to fill until the rims. Sprinkle the top with Sugar and Cinnamon mixture.
~ Bake for 25 to 30 minutes, or until inserted toothpick comes out clean.
~ Rest for few minutes before digging in.


Sending these to Vardhini's Bake Fest event

Saturday, November 2, 2013

Microwave Mysore Pak

Happy Diwali to all my friends and Family. May the light be with you always!


Mysore Pak is a famous sweet dish that originated in city of Mysore, Karnataka. In it's true self it uses quite a bit of butter and long procedure to make. I saw this recipe for microwave recipe on a food group that I am part of and thought of trying it out. It was so quick and easy to prepare that I think this will be my go to sweet if I have to do Indian exotic dessert very quickly.

Prep Time: 10 min | Cooking Time: 5 min

Ingredients:

Besan/ Chick Peas Flour - 1 Cup
Sugar - 2 Cup
Ghee - 1 Cup
Milk - 2 tbsp.


Method of Preparation:

~ In a heavy bottomed pan or wok, fry besan until nice aroma comes and color changes to golden brown. Note that you can do this part in microwave too.
~ Prepare a 6X6 inch dish by greasing the dish with a teaspoon of ghee.
~ Add the remaining ghee in a microwavable container and microwave high for a minute.
~ Add all the remaining ingredients, mix them thoroughly and microwave for three minutes in interval of one minute. Take it out and mix it thoroughly. You should inbetween notice ghee and besan separating, don't worry keep microwaving. At the end of three minutes, heavy bubbles starts to form and everything starts to come together when you mix.
~ Now microwave for one and half minute at the interval of 30 seconds.
~ Take out and immediately pour into the prepared dish and smooth the top.
~ Let it cool for 15 minutes and then cut into desired shape.


Sending this to Vardhini's Diwali Event

Monday, October 28, 2013

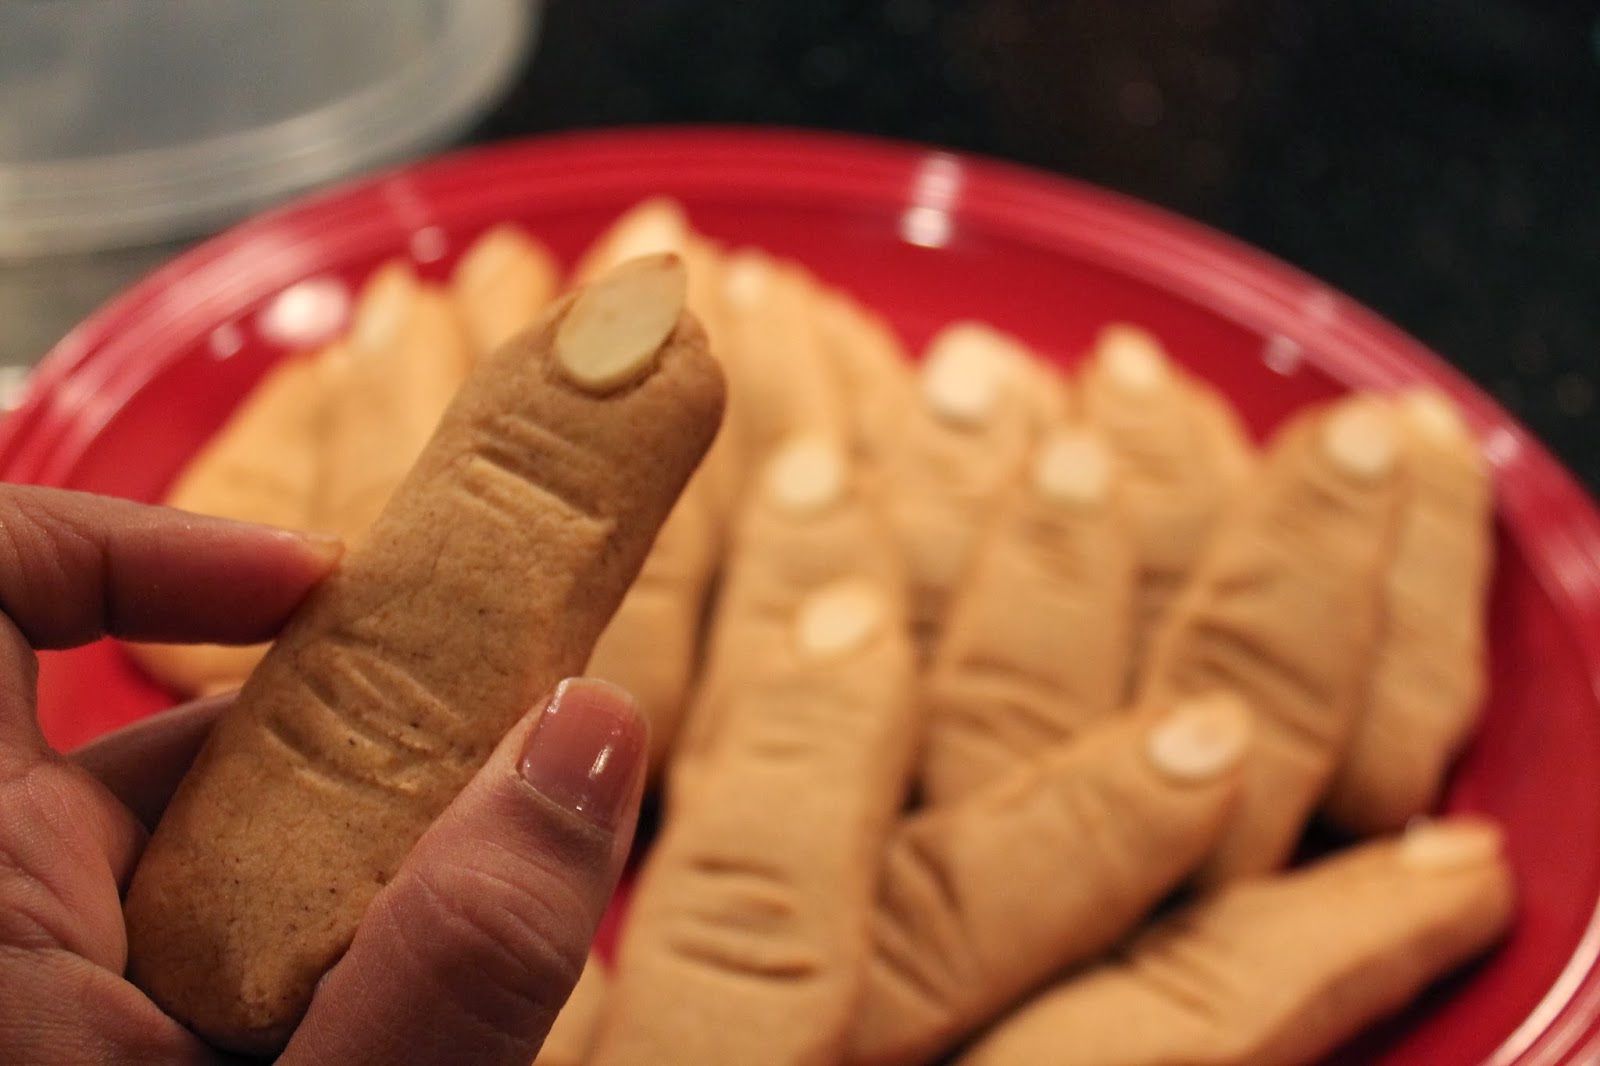
Spicy Spooky Finger Shaped Cookies


Happy Halloween! Halloween is one celebration that I don't get actually. :o) But what to do when you have kids who wants to dress up and a hubby who loves it even more. So I usually go with the flow. First thing kids ask me is what kind of cookie are we going to make. Had done one of these cookies a while back and everybody had enjoyed the spiciness of it. So I decided to make these witches fingers. Basically you can take any good cookie recipe and have fun with the shapes. If you would try these, you sure would say they were spooky and spicy. My friend's kid who saw this refused to eat it coz of the shape. Later when he eventually tried, he wanted another one. But before I could start taking pictures, they started to mysteriously vanish!!. So I hurried and got some pictures before my two little munchkins could clean it up.

Ready to go into the oven


Prep Time: 30 min | Sitting Time: 30 min | Makes : 2 to 3 dozen

Ingredients :

Multi-grain Flour/ All Purpose flour - 1 1/2 Cups
Salt - 1/4 tsp.
Baking Soda - 1/2 tsp.
Cayenne Pepper - 1/2 tsp.
All Spice Powder - 1/2 tsp.
Sugar - 1/2 cup
Unsalted butter - 1/2 cup
Egg - 1
Vanilla extract - 1 tsp.
Nutmeg extract - 1/2 tsp.
Almond Slivers


Method of preparation:

~ Mix and sieve salt, baking soda, Cayenne Pepper and All Spice Powder with flour.
~ In another bigger bowl beat butter and sugar until smooth.
~ Add egg, vanilla and nutmeg extracts.
~ Now mix dry ingredients into the wet ingredients. It would be like a dough.
~ Cover the dough in a plastic wrap and put it in the refrigerator for half an hour.
~ Preheat the oven to 350 deg Fahrenheit.
~ Take the dough out from refrigerator and form it into log. Cut them into four parts. Roll each log out into a rectangle with a thickness of 1/4th of an inch. The length of the rectangle being length of the finger you want. Once rolled out cut lengthwise strips. You will get about 6 or 7 strips.
~ For each strip, shape them with hand, into finger shape. With butter knife score the knuckles. Press in an almond sliver for the finger nail. You can paint it with food color if you would like.
~ Continue to make all the finger shaped cookies. Arrange all the cookies on a cookie sheet lined with aluminium foil.
~ Bake them for 15 to 20 minutes until they are golden brown.
~ Take out on a cooling rack after 2 minutes and allow it to cool completely.

Tuesday, October 15, 2013

Vermicelli Kheer/ Sevai Payas/ Vermicelli Pudding


Kheer is one of the basic sweet that many household in India do. This is one of quickest dessert to prepare. Even here in US I have seen most of the Indian restaurants have either Rice Kheer or Vermicelli Kheer on their buffet menu. This is my mom's recipe that I prepared for Durgashtami. This can be served hot or chilled.

Prep Time : 10 min | Cooking Time : 15 min | Serves : 4


Ingredients:
Ghee - 1 tbsp.
Vermicelli Noodles - 1/2 Cup
2% Milk - 2 1/2 Cups *
Sugar - 1/2 Cup
Safron - Few strands
Raisins and Cashews - 1/4 Cup

Method of Preparation:
~ Heat ghee in a sauce pan, fry raisins and cashews until cashews turn slight brown and raisins plump up (1 minute)
~ Fish them out onto a small plate. Now in the same pan add noodles and fry them until they are golden brown (Note that you can use fried noodles to make it quicker.)
~ In another pan bring milk to first boil with saffron. Immediately add vermicelli and cook vermicelli while stirring. Make sure none of them stick together.
~ Once the milk comes to another boil, add sugar, mix it thoroughly and take it out of heat.
~ Serve it garnished with fried raisins and cashews


Notes:
- Once cooked, the noodles fluff up and absorb the milk. I use 1:5 ratio which gives nice consistency. If you like it thicker you can lower the milk upto 1:3 ratio. If you like it thinner, increase milk to 1:6 ratio.

Sending this delectable dish to Kids Delight @Spice your life
Nupur's Festive Collection
Vardhini's Diwali event


Tuesday, October 8, 2013

Kaayi Obbattu/ Kaayi Holige/ Narla Ubbatti/ Pooran Poli/ Coconut relish filled tortillas


Happy Navarathri everyone! Hope all of you having a good celebrations and enjoying the vacation. Here the weather is quickly changing. Yesterday went out and was surprised to see that all the leaves from four large trees in front of the house were on the ground. Fall is here! But the festivities must go on. Though it doesn't feel like back in India. Dushera used to be a big family gathering for us. Here, not so much. But looking forward to meeting up friends and family soon after Dushera.

Growing up in Bangalore  we got introduced to Kaayi obbattu, that is obbattu made out of coconut. It was a different taste and texture than the soft and melt in the mouth chana daal one. They come out more crisp and break easily when you try to fold. But ofcourse it had to win our hearts since, yeah you guessed it right, there is COCONUT in it. Below is the recipe that my mom follows (well she never measures!) Some use poppy seeds instead of sesame seeds. And ofcourse my main change is I use normal roti flour (which is usually multi-grain flour) instead of all purpose flour. See notes below to make substitution.


Prep Time: 20 min | Makes : About dozen

Ingredients:
Outer covering:
Multi-grain Flour - 1 1/2 Cup *
Water - As required to make dough
Pinch of Salt
Oil - 1 tbsp.

Inner Filling / Hoorna:
Coconut - 1 1/2 Cup
Jaggery - 1 Cup
Ghee - 1 tsp.
Cardamom powder - From 3 pods
Sesame/ Til seeds - 1 tsp.

* Note that the outer covering is usually made of all purpose or Maida flour. I prefer the multi-grain to this. If you choose to do AP flour, just increase the oil to about 2 tbsp. After kneading you have to leave this for atleast an hour.

All Rolled out 

Method of Preparation:
~ In a large bowl mix flour and salt. Add enough water, knead to make smooth dough (of play dough consistency). Now add the oil, knead some more and leave it covered for 30 minutes.
~ Meanwhile, make the hooran part. This is the part that goes inside the outer dough covering.
~ In a thick bottomed vessel, fry sesame seeds on  a low flame. Take out after about 3 minutes.
~ Heat ghee in the same pan and add jaggery.
~ Once jaggery is melted, add coconut, sesame seeds and cardamom powder. Keep mixing until everything nicely combined together. About 7 ~ 10 minutes. Do not keep it too long, otherwise filling will become too thick. Switch off the heat and let it cool.
~ Begin making the flat breads or obbattu only when the filling is cooled off.
~ Make 12 equal parts of the dough and the filling.
~ Sprinkle little bit of flour on the work surface. Take one dough ball and roll out little to make a small circle. Place one filling in the middle. Pull all the sides of the dough and cover the filling completely.
~ Continue to place all the remaining fillings inside each dough ball.
~ Now heat a griddle/ tawa. Roll out the dough (with filling inside) gently. Do not worry if the filling starts to come out a little.
~ Put this on the hot griddle, cook for half a minute and turn it over. Note that it will be just half done.
~ Once the other side is cooked (about a minute), add little ghee or oil on the top and flip it over to complete the cooking process on the first side.
~ You can eat them hot off of tawa with little ghee. This can be stored up to 4 days to a week.
~ To let the obbattu's cool down completely, don't stack them. Just spread it around on an old news paper or on large platter. After it's cooled down, store them in a air tight container.


Sending this festive dish to Chandrani's event Spotlight - Festive,
to Kids Delight @Spice your life
Nupur's Festive Collection
Vardhini's Diwali Event


Tuesday, September 10, 2013

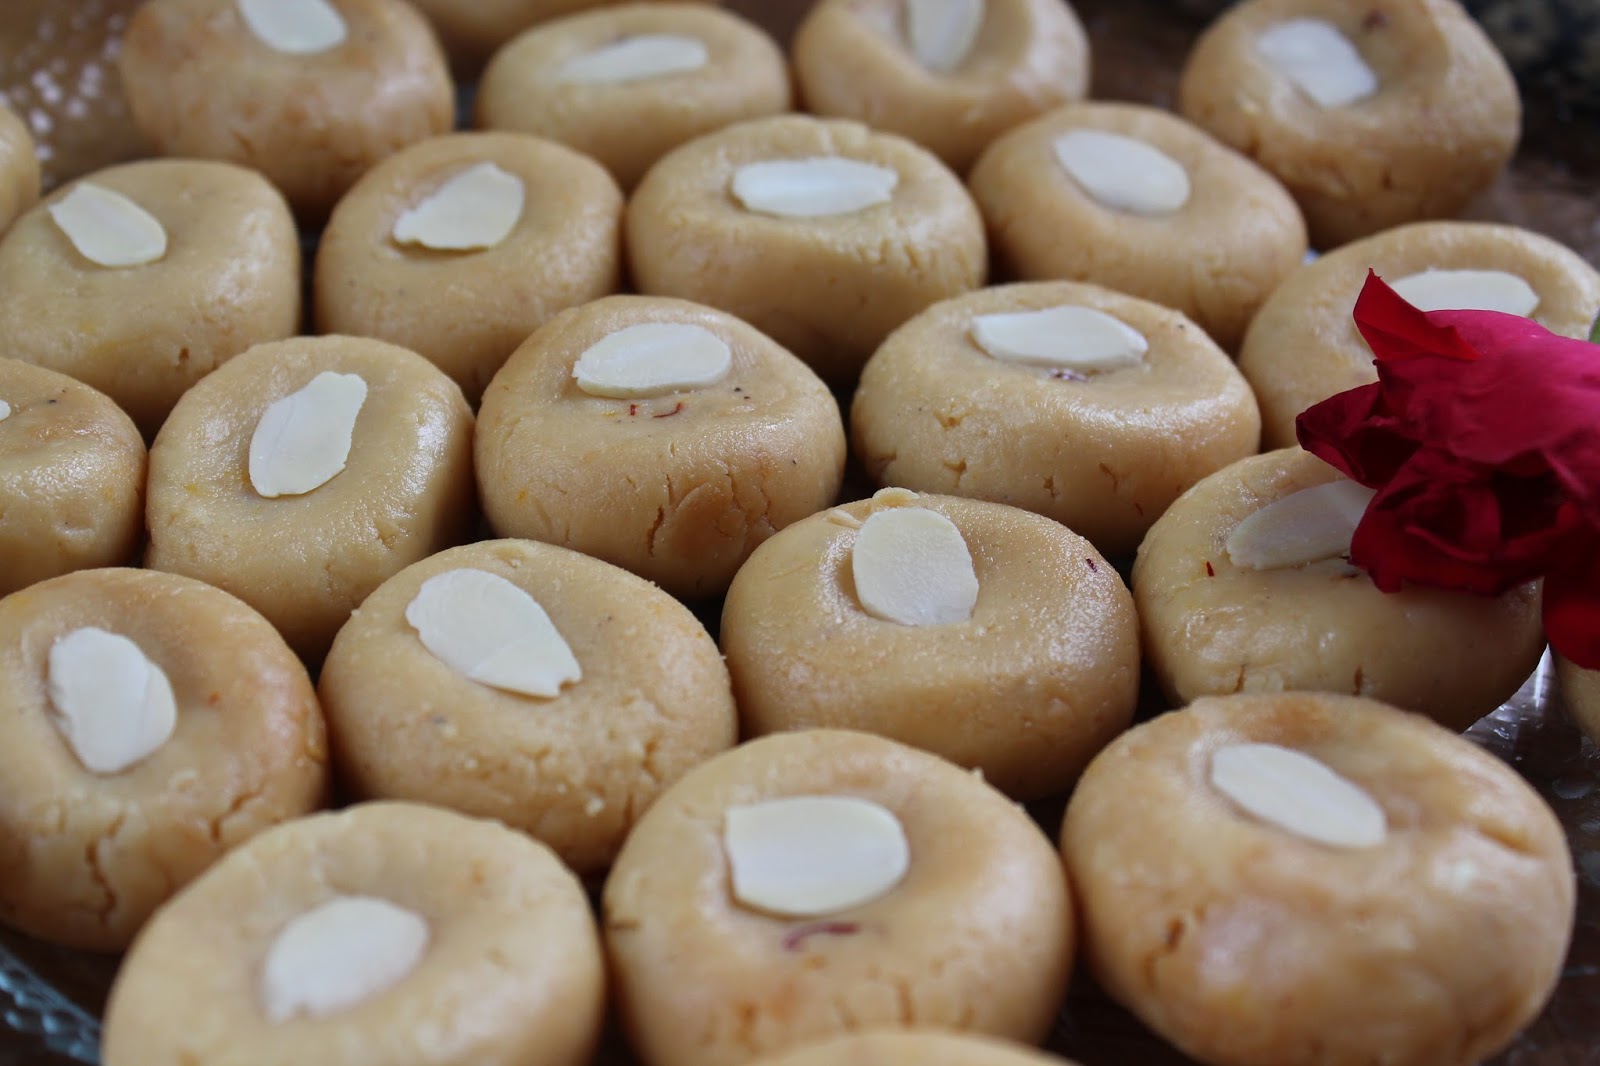
Kesar Doodh Peda/ Saffron Scented Burfi

Hope all of you had wonderful Ganesh Chaturthi celebration! I know many of them keep Ganesha for 5 or more days too. So it's an ongoing celebration with different kind of food and prasad offered God every day. I miss India during these days when everywhere there is rush to buy things, flower vendors lining sidewalks, sweet smell of camphor around the temple, ummmm... and of course last but not least mom making sweets and savories. We used to go around the neighborhood to check the decoration and Ganesha idols. It was fun to exchange later about how many we saw and how beautiful they were.


When my sister moved to Pune after marriage, I visited her three times during Ganpati. It's was another completely different experience being there. The grandeur of this festival need to be seen and felt to believe it. The over the top decorations, markets bustling with people and everyone visiting one Ganpati Mantap to another. DagaduSheth Ganpati is one of the places that's highly crowded, but people love to go there and see how they have decorated the Lord. Ahhh Good old memories. 

These Peda's that I made for prasad were a breeze to make. I use condensed milk so the base is thick to begin with, which reduces the cooking time. This is a variation from the Doodh Peda recipe using fresh Khoya. Try this easy recipe to please everyone and let them thinking that you spent hours to come up with this delicacy. :)


Prep Time: 5 min | Cooking Time: 15 min | Makes : About 2 dozen

Ingredients:

Ghee - 2 tsp.
Condensed Milk - 1 Can
Mava/ Milk Powder - 1 Cup
Almond Powder/ MTR Badam Powder mix - 2 tbsp.
Kesar/ Saffron strands - 6 to 7
Cardamon - seeds from 5 to 6 pods crushed fine
Slivers of Almond for decoration


Method of Preparation:

~ In a heavy bottomed pan, add ghee and heat the condensed milk.
~ Once it's starts to bubble, add rest of the ingredients, except slivers of almond.
~ Keep mixing on a medium heat, until the mixture starts to leave the sides. This takes about 6 to 7 minutes.
~ Switch off and wait for 10 minutes for it to cool down.
~ Pinch out small balls from the mix and shape them round. Press gently in the middle with your thumb and place a sliver of almond in it. 

Notes:

- Switch off the gas once the mixture starts leaving the sides. If you heat it for too long, it becomes hard and chewy.
- If the mix becomes too hard and cannot be shaped, slowly add few drops of hot milk and keep mixing with hand until you can make small balls.
- This can be stored in air tight container on the shelf for 2 days and in the refrigerator for a week or so.

Thursday, August 29, 2013

Angoori Lassi/ Grapes Lassi

Lassi is a great thirst quencher in hot summer days. Even though the summer is coming to an end, ( have you noticed there are fall and winter stuff everywhere!!) after the kids come back from playing, they love to get their hands on any kind of cold juice. I usually keep OJ. When they would want something else, I let them pick their fruits and make them a juice.


This Angoori Lassi is a twist to the regular lassi. Made out of angoor or grapes, the lassi takes the color of grapes used. Here I have used black seedless grapes, which gives a nice purple shade to the Lassi. If you use green ones, it gives a beautiful pale green color.

Prep Time: 5 min | Makes : 2 tall glasses


Ingredients:

Seedless Grapes - 1/2 Cup
Non-flavored unsweetened Yogurt - 1 Cup
Cold water/ Ice - 1 Cup
Honey/ Sugar - 1 tsp.
Salt - a pinch
Cumin/ Jeera powder - 1/2 tsp.


Method of Preparation:

~ Blend all the above ingredients and serve it chilled.

Tuesday, August 20, 2013

Eggless Mocha Chocolate Chip Banana muffins

Happy Raksha Bandhan everyone! This is a festival to celebrate the love between brother and sisters. A festival where all the sisters tie a beautiful Rakhi to their brothers and get blessings and gifts from them. "Raksha" means Protect and "Bandhan" means Bond, that is the Bond of Protection. One of the sweet tradition in India where brother vows to protect his sister no matter what. And sister ties the sacred Rakhi to protect her brother from any harm.


This festival we decided to this mocha chocolate chip banana muffins. My son loves mocha flavors and chocolate chips, well what's not to like about them. Banana was riped and was calling for some attention before they turned black. So here is what we did. Hope you all had a beautiful celebrations with your loved ones..


Prep Time: 15 min | Baking time : 25 to 30 min | Makes : 15 to 18 muffins


Ingredients

Multi-grain + AP flour - (2 + 1/4 Cups)
Salt - 1/4 tsp.
Baking Powder - 1 tsp.
Baking Soda - 1 tsp.
Softened Butter + Olive Oil - (1/2 + 1/2 Cup)
Sugar - 1 1/4 Cup
Flaxseed meal - 1 tbsp. (Or 1 Egg)
Banana - 3 ripe
Instant Coffee granules - 1 tbsp.
Vanilla Extract - 1 tsp.
Semisweet Chocolate Chips - 1 Cup


Method of Preparation:

~ Preheat the oven to 350 deg. Farenheit.
~ Soak flaxseed meal in 1 tbsp. of water and keep it aside
~ Dissolve instant coffee granules into 1 tbsp. of warm water and keep it aside.
~ In a medium bowl sieve flour, salt, baking powder and baking soda.
~ Take a large mixing bowl and mash the ripe bananas in it.
~ Using a hand blender, blend in butter, oil, sugar, soaked flaxseed meal (or egg), soaked coffee and vanilla extract.
~ Now add the dry ingredients to this wet ingredients and mix gently until the flour is blended well. 
~ Add chocolate chips and fold in gently with a wooden spoon.
~ Line the muffin pan and spoon the mixture into them.
~ Bake for 25 minutes or until the toothpick comes out clean in the middle.
~ Cool them all on wire racks and enjoy with a hot cup of coffee.


Sharing these beauties @
Sara's Corner Cooking with Love @ Gujarati Zaika
Related Posts Plugin for WordPress, Blogger...