Showing posts with label Main Entree. Show all posts

Sunday, May 4, 2014

Chicken Enchiladas


Feliz Cinco De Mayo amigos! Make and enjoy some of these enchiladas tomorrow. If you are meatless on Monday, you can always skip the chicken. It's very easy to put together and very very filling. Feliz word always reminds me of my amigo Julia. She is no more, but her memories are here for me to cherish. She had a beautiful soul. She was the one who introduced to me loads of Mexican dishes and festivities.

I love Mexican food since it's spicy like Indian cuisine. And also most of them are pretty easy to put together. Indian cuisine we serve roti/ tortilla separately and in Mexican tortillas used in different ways to hold, roll the vegetables and cheeses inside/ top. :o)


Ingredients:
Cooked Chicken (optional) - 1 Cup
Chopped Onion - 1/2 Cup
Cubed bell peppers - 1/2 Cup
Sweet Corn kernels - 1 Cup
Black\ Pinto or Soya Beans - 1/2 Cup
Jalapeno Peppers - 2 (finely chopped)
Tortillas - 8
Salsa - 1 to 1 1/2 Cup
Shredded Cheese - 2 Cups
Olive Oil - 1 tsp.
Salt - 1/2 tsp.
Coriander leaves to sprinkle on top.


Method of Preparation:
~ In a wide pan heat oil. Add onion and bell peppers. Add a pinch of salt and saute on high until onion becomes tender.
~ Now add corn and jalapeno peppers.
~ If you are using canned beans, strain the liquid and wash them thoroughly under running water.
~ Add in the beans and continue to cook. Once everything is thoroughly mixed, adjust the salt and remove from heat.
~ Preheat the oven to 375 degrees.
~ Once the mixture is cooled a little, divide them into eight equal parts. Put it right in the center line of tortilla and roll them up.
~ Spray a baking dish lightly and place the rolled up tortillas. Bake for 15 minutes.
~ Take them out, top it with salsa and cheese. Again bake for another 7 to 10 minutes.
~ Serve it hot with a side of guacamole and extra salsa.


You might also be interested in:
Guacamole
Grilled Corn Salsa
Pineapple Salsa
Vegetable Quesadillas

Linking this recipe to
HearthAndSoulBlogHopProjectInspiredTurnItUpTuesdayAnythingGoesRecipeOfTheWeekShareYourStuffCreativeCornerDareToShareTryANewRecipeBragAboutItDIYSundayFoodFridayFavoriteThingsFridayFrenzyHappinessIsHomemadeWeekendRetreatShareItSundayMeltInYourMouthMondayWhat'dYouDoThisWeekendMuchAdoAboutMonday,

Thursday, March 20, 2014

Kheema Pulav/ Aromatic Rice with Ground meat


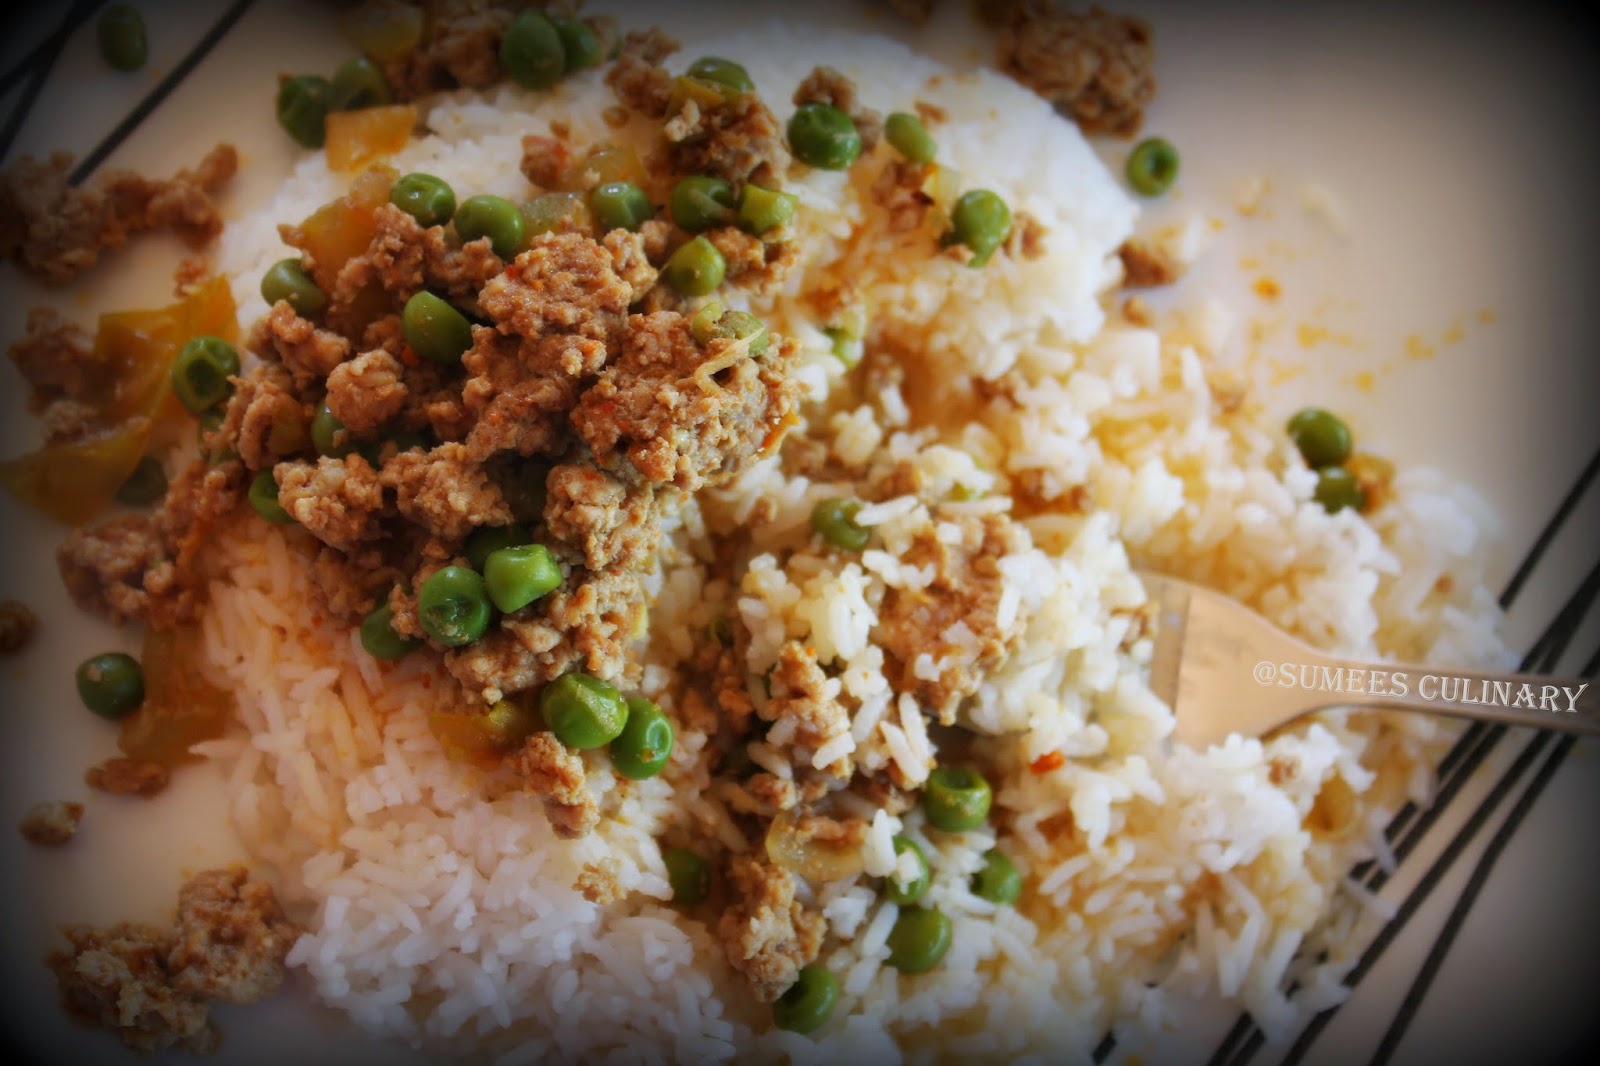
One of the easiest and quickest pulav/ Pilaf that I make. My kids LOVE it. I make this often when I have ground meat and craving for some carb. It makes a nice lunchbox recipe for kids. Here I took pictures before I mixed the rice and the kheema. Often, I mix them up and serve it to kids.

Prep Time: 5 min | Cooking Time: 15 min | Serves : 4

Ingredients:

Chicken Kheema/ Ground Meat - 1 lb/ 500 gm
Frozen Peas - 1 Cup
Chili Powder - 2 tsp.
Turmeric Powder - 1/2 tsp.
Ginger paste - 1 tsp.
Garlic - 4 to 5 cloves, chopped fine
Onion - 1 small, cut fine
Tomato - 1 medium, cut fine
Oil - 1 tbsp.
Salt - 1 tsp.
Lime Juice - 1 tsp.

For Rice:
Sona Masoori Rice - 1 Cup
Oil - 1 tsp.
Lime Juice - 1 tsp.

Method of Preparation:
~ Prepare Rice with oil and lime juice while cooking. Once done, keep it aside.
~ In a wide pan, saute onion and garlic in the oil.
~ Add tomato, ginger, turmeric and chili powder. Fry until the raw smell of tomatoes is gone, about 3 minutes.
~ Now add the ground meat and fry until they are cooked through. There shouldn't be any pink meat left.
~ Thaw frozen peas in microwave for 3 minutes and add it to the kheema.
~ Add salt to taste and a tsp of lime juice. Mix them well and top it on cooked rice. Serve hot.


Sending this to  Hearth And Soul Blog Hop Favorites event @MaNiche, ProjectInspired, TurnItUpTuesday, TastyTuesdayChefInTrainingIn&OutOfTheKitchen, AnythingGoes, RecipeOfTheWeekDoTellTuesday, ShareYourStuff, CreativePartyCreativeCorner, DareToShareTryANewRecipe, BragAboutIt, MaMade, FoodFriday, PinWorthyProjects, Sweet&SavoryFavoriteThings, ShineASpotlight, Showlicious, SaturdayNightFever, HappinessIsHomemade, ShareItSunday, MeltInYourMouthMonday, What'dYouDoThisWeekend, MuchAdoAboutMonday

Wednesday, January 29, 2014

Poori/ Fried Indian Flatbread


Poori who doesn't love this. This soft puffy looking are a delight for my kids. Though I don't do it very often, just because it's deep fried, I do it for festive occasions or when my kids asks for it. I hadn't had a chance to take pictures, since the minute hot ones comes out, kiddos want it. When some of my friends asked me to post this recipe, I took these pictures. So here you go on the recipe.

Ingredients:

Whole Wheat Flour - 2 Cups
Suji Rava/ Fine Semolina - 1 tsp. (optional)
Water - About 1 Cup
Hot Water - 1/2 Cup
Oil - 1 tbsp.
Salt - 1 tsp.
Vegetable oil to deep fry the pooris

Method of Preparation:

~ Take wheat flour, suji and salt in a wide mixing bowl.
~ Add hot water and carefully mix the water into dough. You can use spoon to mix at this stage so that you won't burn your hand.
~ Now start adding the regular water slowly until it comes together as pliable dough.
~ Add one tbsp. of oil and start kneading properly. You can use kneading blade and do it this in food processor too. Once you have smooth dough, make lime size balls.
~ While you are kneading, heat oil for deep frying.
~ Roll the dough balls into medium thickness circle.
~ Check the temperature of the oil, by dropping in a small pinched piece of dough. If it rises up immediately that means you are ready to roll and start deep frying.
~ Drop one poori (be very CAREFUL and gentle with hot oil) at a time in the oil. Using slotted ladle gently touch the top of the poori. This makes the poori to puff up.
~ Once a nice brown color has formed on the bottom side, flip the poori to the other side and fry for few seconds.
~ Using the slotted ladle take the poori out onto a paper towel to soak up any excess oil.
~ Serve them hot. The best combination to serve these pooris are Batate Song (a konkani style potato curry) or Vegetable Kurma. Pictured above with Batate Song and Tofu Spinach Stir-fry


Notes:
~ Do not let the dough sit, once kneading. Start making the pooris right away.
~ If the dough is rolled out too thin, it won't puff up properly.
~ Make sure to hold the poori down in the oil with the slotted spoon for few seconds. This makes the poori to puff up.

You might also be interested in -
Vegetable Kurma
Tofu Spinach Stir-fry

Saturday, January 4, 2014

Paneer Makkhanwala/ Butter Paneer Masala


Happy New Year everyone! Hope you all have a very lovely New Year's, whether you partied hard all night or snuggled in before the clock hit 12:00, am sure you enjoyed in your own way. Here is a wishing for a Happy and Healthy New Year!

Paneer dishes are always a party and kids pleaser. I have met very few who don't like this dish. I use almost the same recipe for Butter Chicken too and it turns out finger-licking-delicious! I use cream for this recipe and also tomato sauce can. This makes the preparation very quick. If you do not want to use canned tomatoes, you can blanch the tomatoes, remove skin and make a puree to use it in the recipe.


Prep Time: 10 min | Cooking Time: 20 min | Serves: 5

Ingredients:

Paneer Cubes - 2 Cups
Butter - 2 tsp.
Oil - 1 tsp.
Bay Leaf/ Tez Patta - 1
Ginger Paste - 2 tsp.
Garlic Paste - 2 tsp.
Tomato Sauce - 1 Can
Chili Powder - 1 tbsp.
Turmeric Powder - 1/2 tsp.
Cream/ Heavy Cream - 1 Cup
Kasoori Methi - 1 tbsp.
Garam Masala - 1/2 tsp.
Salt - 1/2 tsp.

Method of Preparation:

~ In a thick kadai, heat butter and oil. Add the bay leaf, ginger and garlic. Saute till the raw smell goes away.
~ Now add the tomato sauce and fry until it starts to leave the sides of the pan. This takes about 10 minutes.
~ Add chili powder, turmeric powder and two cups of water. Again bring everything to boil.
~ Reduce the heat, add cream, kasoori methi and garam masala. Gently mix all of them together.
~ Finally add the paneer cubes, add very little salt and heat until it just starts to bubble.
~ Take it out of heat and serve with hot Roti, Dosa or Paranthas.


Monday, November 11, 2013

Basil Zucchini Noodles with Grilled Corn


I have to admit, we are hooked on to Zucchini noodles at our home. It's so much healthier than the starchy noodles, fills you up and are super quick to make. I don't have a tool to make the zucchini noodles to come out in exact round noodles. So I just use a peeler to make flat noodles out of Zucchini. This is how they look.


Zucchini is almost out of season now, while it was in season, I was buying them from the local market. They had some of the huge ones that I had never seen before. So bring one and you are set for 2 or 3 recipes. :o)

Prep Time: 15 min | Cooking Time: 15 min | Serves : 4
* Serving Size: 2 Cup | Calories: 104 | Carbs: 20 | Fat: 2 | Protein: 6 | Sugar: 10 | Sodium: 313

Ingredients:
Zucchini - About 4 Cups of Noodles
Hot green peppers - 2
Onion - 1 small
Tomato - 3 medium
Colored Bell Pepper - 1 small
Garlic - 6 big cloves
Lemon Basil - big handful
Corn from Grilled Corn on the cob / Some roasted fresh corn - 2 Cups
Salt to taste


Method of Preparation:
~ Finely chop peppers, onion, tomato and garlic. Place all of it in a sauce pan and cook for about 5 minutes stirring once in a while. Add salt to taste.
~ Meanwhile bring water to boil in a pot and add salt. Add Zucchini noodles and cook for 3 minutes until just done. Drain the water and drop the noodles into the sauce.
~ Top it with roasted Corn and chopped Basil leaves.
~ Enjoy a nice hot one pot meal.

Disclaimer: Nutrition fact is based on ingredients that I have used and is an approximate. It is calculated using Recipe Nutrition Calculator from a health website.

Sending this healthy seasonal fresh food over to Nandoo's Eat Seasonal Food event

Wednesday, November 6, 2013

Arugula Salad Pizza


One fine day when I switched on Food Network, saw Ree of Pioneer Woman cook a Fresh Herb Pizza. It looked exactly like the one that I had fortnight ago at a family owned pizza place. And that weekend, our friend who picks up their fresh produce from a  farm where they have membership, dropped some salad greens. Stars must have aligned right, so it was a sign, and I made this beautiful looking pizza. It was an instant hit with my family. Other than younger one, who despises any green fresh thing on her food, all of us devoured it. I left half of the pizza uncovered for her and she loved every bit of it. And I am not kidding when I say all of us over ate. BTW just noticed that this is my first post with yeast. Yes! I am not afraid anymore to use yeast in my recipes.


Prep Time: 15 min | Inactive Time: 1 Hour | Cooking Time: 15 min | Serves: 4

Recipe Based on: Fresh Herb Pizza

Ingredients:

Pizza Base -
Multi-grain Flour/ AP Flour - 2 Cups
Active Dry Yeast - 1 tsp.
Warm Water - 1 Cup
Salt - 1/2 tsp.
Pepper - 1/4 tsp. Freshly ground
Light Olive Oil - 1/4 Cup
Olive Oil for drizzling - 1 tbsp.

Pizza Sauce - 1 Cup
Shredded Cheese - 1 Cup


Salad Topping -
Arugula - 1 Bunch
Pomegranate seeds - 1 tbsp.
Salt
Pepper
Lemon Juice - 1 tsp.
Olive Oil - 1 tsp.


Method of Preparation:
~ Add yeast into the warm water and let it sit for 5 minutes.
~ Meanwhile, add some salt and pepper in the flour. Mix in olive oil and combine well. Now slowly add the yeast mixture and mix until just combined.
~ Add 1 tbsp. of olive oil and just roll the dough lightly, cover the container and leave it to rise for atleast an hour in a warm place.
~ When ready to make the pizza, preheat the oven to 500 deg Fahrenheit.
~ Take out the pizza dough cover, punch the dough lightly and start rolling it out. Drizzle little oil on the pizza stone or pizza pan or sheet, and transfer the rolled out pizza on to this.
~ Top the pizza base with pizza sauce and shredded cheese
~ Bake this for 15 minutes on the bottom rack, or until the crust is golden brown.
~ Toss all the ingredients together for the salad. Top the pizza with salad and serve it.


Notes:
~ You can use different types of greens salad. Sky is the limit as to what you want to top it or what kind of salad.
~ Or can just have pizza with just sauce and cheese.
~ Store bought pizza sauce can be used or even ketchup would suffice.
~ Can serve it topped with Parmesan cheese.

Sending this yummy pizza to Vardhini's Bake Fest event

Monday, August 12, 2013

Crab Sukka/ Kurle Sukke

After almost three months in India, I have gotten so many recipes to share. One of my favorite is this crab sukka. In konkani we call it "Kurle". While visiting mom she was whipping out her delicacies one after the other. This is one of her dishes that I love. Crab was really fresh that day, so dad bought it home. Once Aayi started preparing the curry it was smelling great in the whole house. I was so hungry smelling the dish that I took some quick pictures and sat down to gobble it.


This typical Konkani dish is made in different versions. Sukka or dry version is what I have presented here. You can make more finer paste of coconut paste and use more water and turn it into curry. Now to the recipe.

Prep Time: 20 min | Cooking Time : 20 min | Serves : 6

Recipe Source : My Aayi

Ingredients:

Fresh Crab - 2 lb. / 1 Kg
Onion - 1 medium for frying
Onion - 1/4 cup for blending
Oil - 2 tsp.
Tomato/ green mango - 1 cup *
Turmeric - 1/2 tsp.
Chili Powder - 2 tsp.
Garam masala - 1/2 tsp.
Coconut - 1 cup
Coriander powder - 1 tsp.
Mustard seeds - 1 tsp.
Red chilies - 3
Garlic - 5 to 6
Salt to taste


Method of Preparation:

~ Clean crabs thoroughly with water. Remove hard shell top part and discard. Break the claw or Dongo. This will be used in the sukka. Rinse it all again and keep it aside.
~ In a heavy bottom vessel, add cooking oil and onion. Fry till onion becomes translucent.
~ Add the cleaned crab and tomato. Cook until nice kurle aroma starts to come (about 5 minutes)
~ Then add turmeric, chili powder and Garam masala powder. Mix them all well.
~ Meanwhile, make dry coarse paste of Coconut, Coriander powder, Mustard seeds, Red chili, Onion, and garlic.
~ Once crab is almost cooked (smells divine) add prepared coconut paste.
~ Add little salt (careful since the shell seafood have salt mostly), mix them all nicely. Crab is ready to be served.

Note: You can use Tamarind paste instead of tomato. Use about a tbsp. of fresh tamarind extract. I have been trying to reduce the usage of tamarind, since it's known to cause severe acidity. 

Tuesday, April 16, 2013

Peanut Tofu Stirfry

Another of my tofu stir-fry. These are very easy to put together on weeknights. And gives loads of protein share of the day. You don't have to add any greens to it. But I like to do it, since it gives nice color and texture to it. Have you tried my Tofu and Spinach Stir-fry before? That is another quick recipes. 


Prep Time: 10 min | Cooking Time: 15 min | Serves : 4

Ingredients:

Firm Tofu - 2 Cups (1 pkg)
Spinach/ Kale - 1 Cup
Onion - 1 medium - thinly sliced
Garlic - 4 - Crushed
Peanut Butter - 2 tbsp
Sriracha/ Red Chili Sauce - 1 tbsp.
Soy Sauce - 2 tsp.
Chili Garlic Sauce - 1 tsp.
Salt to taste
Sesame/ Olive Oil - 1 tbsp.


Method of Preparation:

~ Chop the tofu in chunks, wash and chop greens thin.
~ In a wok, add oil. When heated through add garlic and onion.
~ Fry until onion is soft and transparent.
~ Add the spinach leaves and saute until they wilt.
~ Turn the heat up a little and add the tofu. Wait for two minutes before turning the tofu, so that it forms a nice crust outside and also doesn't break the tofu.
~ In a microwavable dish heat peanut butter for 20 seconds. Add chili sauces and soy sauce and give it all a stir.
~ Add this sauce mixture and salt to tofu and combine them gently.


Sending this protein power house dish to my event Bon Vivant #14 - Spring Surprises

Also sending it to 
~ Foodie Mom Cooks event Healthy Stirfry
Foodabulous Fest Event organised by Simply TADKA and hosted by Pramitha love cooking 

Friday, April 5, 2013

Lemon Mint Couscous with Sautéed Vegetables

Couscous is one of the easiest to put together and also so versatile. It soaks in any kind of sauce you add. Pearl couscous has become one of our favorites at home. It contains loads of Vitamin C and can be used in place of any pasta. This particular variety serves as one pot meal for weeknights. While serving you can choose to mix them up or serve separately as shown in the picture. Try this fresh mix of vegetables and enjoy all the time that you saved. :o)


Prep Time: 10 min | Cooking Time: 20 min. | Serves: 4


Ingredients:

For Couscous -
Pearl Couscous/ Israeli Couscous – 1 Cup
Olive Oil – 2 tsp.
Water – 2 Cups
Lemon Zest (From one lemon)
Lemon juice – About 1 tbsp. from half of the lemon
Mint leaves – 4 to 5 leaves – chopped fine.


For Sautéed Vegetables (You can pick and choose what you like)
Asparagus – 15 to 20 stems
Edamame / Soy Beans – 1 Cup
Baby Carrots – handful – chopped into matchsticks
Bell Pepper – 1 small – Chopped into sticks
Chili powder – ½ tsp
Olive oil – 1 tsp.
Salt to taste


Method of Preparation:
~ Boil the water in a small sauce pan or kettle.
~ Heat Olive oil in a wide pan and roast pearl couscous until they are light brown.
~ Add the hot water and let the couscous cook for about 5 minutes. 
~ Once all the water has dried up, couscous is cooked, switch off the heat. Now add lemon zest, lemon juice and mint leaves. Cover and let it sit.
~ In another wide pan or a wok, heat oil.
~ Add chopped bell pepper, carrots and asparagus. Saute for few minutes.
~ Add thawed soy beans, chili powder and salt to taste. 
~ Continue to saute for another minute or two and switch off. The vegetables need to have some crunch to them. 
~ Serve them warm.


Sending this refreshing dish to my event Bon Vivant #14 - Spring Surprises
Also sending it to,
~ Foodie Mom Cooks event Healthy Stirfry
Foodabulous Fest Event organised by Simply TADKA and hosted by Pramitha love cooking 


Wednesday, March 13, 2013

Coriander Pulav/ Cilantro Vegetable Rice

My little one is a big fan of rice dishes. So I keep making various forms to serve some fun. And after her birthday, she has fallen sick and so I have become slow in putting up anything on the blog. This pulav is one that my mom makes with green masala. It's very fragrant and colorful, and to top it, it's very easy to do.


Prep Time: 10 min | Cooking Time : 20 min | Serves : 6

Ingredients:

Cooked Rice - 4 cups
Cilantro/ Coriander Leaves - 1 bunch
Green Chilies - 4
Ginger - lemon size, grated
Garlic - 4 pods
Mixed Vegetables (I usually use Peas, Onion, Carrots, Cauliflower, Bell pepper) - 1 cup
Cardamom Pods - 2
Beaten Yogurt - 1 cup
Lime juice - 2 tsp.
Oil - 2 tsp.
Salt to taste


Method of Preparation:

~ Prepare green masala first. Grind Cilantro, green chilies, ginger and garlic to fine paste using very minimal water.
~ In a wide pan, heat oil add cardamom pods, then add all the vegetables and saute until they are almost done. 
~ Add prepared green masala/ paste and fry until the raw smell goes away.
~ Add the beaten yogurt and salt; mix well.
~ Reduce the heat to low setting, add the rice to the vegetable.
~ Give a gentle mix to coat all the rice, check for salt and then add the lime juice.
~ Cover the rice and keep it on lowest setting for 5 minutes and switch off the heat. 
~ Serve it hot with Raita


Notes:
1. If using frozen vegetables, thaw it by microwaving them. It reduces the time of cooking.
2. Add the beaten yogurt and do not let it boil, add the rice immediately. This would ensure that the yogurt is not curdled. 


Sending this kids favorite to Bon Vivant #13 - Kids Delight going on now @SumeesCulinary.
Foodabulous Fest @SimplyTadka,
Cook Like Celebrity Chef @FoodSrilanka
Let's Cook for Kids @SimplySensational

Saturday, March 2, 2013

Thai Basil Chicken


Thai is one of our favorite food option that we go to when eating out. And almost all the Thai restaurants feature basil chicken/ Shrimp. Some of them use ground meat and some chunks. This is one of the dish we usually order. Most of the restaurant dishes though are "loaded" with calories. To begin with, have you seen how much oil is floating around in the served plate? So I try to recreate the favorites at home, so kiddos don't miss out on their favorites.

I came up with this recipe while on time crunch. And this was ready in minutes and it tasted, um umm ummmm... Since then I have repeated this and every time kids have cleaned their plate asking for more. You can serve it on top of brown/ white rice or use it in a roll.

Prep Time : 10 min | Cooking Time : 15 min | Serves : 4


Ingredients:

Ground Chicken/ Turkey - 1 pound *see notes for replacement
Basil leaves - Bunch
Onion - 1 slit lengthwise
Bell Pepper - 1 Slit lengthwise
Cabbage - Cut lengthwise - 1 cup
Chili Garlic paste - 1 tsp.
Soy Sauce - 1 tsp.
Sesame Oil - 1 tsp.
Salt to taste


Method of Preparation:

~ In a wok add sesame oil and put it on height heat. Stir fry Onion and Bell Pepper.
~ Add meat and mash to get through the lumps.
~ Once it's almost done, add cabbage and chili garlic paste, soy sauce.
~ Now top it with cut basil leaves and add salt to taste. Give it a thorough mix and remove from heat.
~ Serve it on top of fresh hot rice.


Notes:

1. You can replace the meat with dry soy chunks. Use two cups Nutrella dry soy chunks or soy granules. Soak it in boiling water for about half an hour (or can pressure cook for a whistle). Use it instead of meat.
2. Fresh soy meat is available in several stores in US. It's fresh and packed with protein. So next time you go to a grocer, look around for this veggie substitute.

Sending this kids favorite to Bon Vivant #13 - Kids Delight going on now @SumeesCulinary.

Hearth&Soul Bloghop @Zesty South Indian Kitchen

Monday, January 14, 2013

Khara Pongal/ Savory Rice dish


Happy Sankranthi everyone. Hope all of you had good celebration. Sankranthi is a harvest festival in India. And usually celebrated exchanging of Sweets made of Sesame seeds, Sugar Candies, Sugar Cane sticks and fruits. The idea was to distribute sweets to spread the sweetness in the community. Back in Bangalore my mom would prepare many plates of all the delicacies and send us to distribute to neighbors and friends. I would even take smaller packets to school to distribute to all my friends. Her "Tilgul" mixture is a classic! 


Pongal is something that my mom learnt in Bangalore. The name Pongal means dish made by boiling milk and rice. Fresh harvest rice would be used to make sweet or savory dish to enjoy during this festival. Today I made savory version of Pongal. By the way Khara means "Spicy" in Kannada. My previous attempts were just so so and I wasn't too pleased with it, coz it was more or like Khichdi. I was telling that to my little sister and she gave me her version of Khara Pongal. It turned out really delicious. Kiddos wanted to eat only that (without the nuts ofcourse!!) It was all yummy goodness. 

Prep Time : 5 min | Cooking Time : 15 min | Serves : 6

Ingredients:

Rice - 1 Cup
Moong Dal / Yellow split peas - 3/4 Cup
Ghee - 2 tsp.
Cashew nuts - handful
Mustard seeds - 1 tsp.
Jeera/ Cumin Seeds - 1 tsp.
Hing/ Asefoetida - 1/4 tsp.
Green Chilies - 4 finely chopped
Ginger - Small piece - sliced in thin sticks
Curry / Kadipatta leaves - few
Dessicated Coconut - 1/4 cup
Turmeric powder - 1/2 tsp.
Pepper powder - Crushed - 1/2 tsp.
Salt - 2 tsp.
Water - 3 Cups
Milk - 1 Cup


Method of Preparation :

~ Wash rice and daal thoroughly. Fill with water and keep it aside to soak.
~ In a wide cooker, heat ghee or oil and roast cashew nuts. Keep it aside once done.
~ In the same pan, add Mustard and Cumin seeds. 
~ Once it crackles, add Hing, Green Chilies, Ginger and Curry leaves. Fry for few seconds.
~  Add washed Moong Dal and Rice. Fry for a minute.
~ Add water, coconut, salt and turmeric powder.
~ Cover and pressure cook for three or four whistles.
~ Once the pressure cooker is cooled down, take out and garnish with pepper powder and roasted cashews.
~ Your one pot meal is ready to be served!


Sending this to ongoing Bon Vivant #11 - Healthy Appetite
and Vardhini's New U,
Preeti's Foodabulous

Tuesday, November 15, 2011

Afghani Chicken Pulao - Qubuli Uzbaki

Here we have some nice restaurant’s closer to the downtown area. Since it’s pretty far, we would hardly go try any. One day after a zoo visit, we thought we will visit one of the Thai restaurant’s that some of our friends rave about. But we couldn’t figure out where it was (later found out it was just two blocks down), and being very hungry we entered this very traditionally decorated restaurant, which looked like a middle-eastern. It was Sameem, an Afghani restaurant. The food over there was amazing. Very flavorful and but not too heavy. We still thoroughly enjoy our rare visits there, though they have very limited menu.


So why am I talking about this restaurant? Well, today is blog hopping day and I have been assigned Shireen's Ruchik Randhap. When I saw the schedule itself I was nervous, coz of my dilemma. Out of so many beautiful dishes on her blog, I started listing the dishes I would love to try. It became quite big, and was sitting and wondering when my DH came to my rescue. I showed him the list and asked him what he would like to eat. After he narrowing down to biryani/ pulao, I chose her Qubuli Uzbaki - Afghan style Pulao. The outcome was just delicious. It was very light and almost authentic as what we ate at Afghan restaurant. I say almost, coz I did make variation to add more spices. J. So go on, try this one and you won’t regret your choice of meal for the day.


Serves: 5 | Prep Time: 30 min | Cooking Time: 40 min

Ingredients:
Basmati Rice – 1 ½ cups
Chicken - 1 KG. (little over 2 LBs) 
Onion - One large - sliced lengthwise
Chili powder - 2 tsp.
Turmeric powder - 2 pinch
Ginger garlic paste - 2 tsp.
Garam masala - 1 tsp.
Peppercorns - 10
Saffron - 1 pinch
Milk - 1/4 cup
Baby carrots - 15 - Cut julienne (size of a matchstick)
Raisins - handful
Pistachio - handful 
Almonds - handful
Salt to taste
Olive Oil - 4 tbsp
Water – About 3 cups

Method of Preparation:

Prepping -
~ Cut and clean the chicken. Wash thoroughly; set it aside to drain the excess water.
~ Soak saffron strands in milk and set aside.
~ Wash rice thoroughly once. Soak it for 10 min. Drain and set aside.
~ Cut Onions and Carrots and keep aside.


Getting to serious business -
~ In a heavy bottomed pan, heat 2 tbsp. of oil.
~ Add onion and fry them till translucent.
~ Add ginger, garlic and fry until the raw smell goes away.
~ Add Turmeric, Chili and Garam masala powders. Mix them thoroughly and add peppercorns.
~ Add chicken, salt to taste and fry on high for 5 minutes.
~ Reduce the heat to medium, add 1 cup of water, cover the pan and cook till chicken is done. It took me about 10 min.
~ Switch off the heat, take out the chicken and set aside. Reserve the stock.
~ In the same pan, heat remaining oil and fry raisins until plump. Take it out and set aside. Same way fry Pistachios and almonds for few minutes and set aside.
~ Add julienne carrots and fry for 2 minutes and spread them at the bottom of the pot. (Idea is to avoid burning the rice!)
~ Now start layering on top. Put half of the rice, pistachio & almonds, chicken, remaining rice and finally raisins.


Ain't this layer BEAUTIFUL!!!
 ~ Top with saffron milk, chicken stock. You will have to add another 2 cups of water. The level of the water should be just 1/2 inch above the rice layering.
~ Bring water to boil. Reduce the heat to simmer/ low (about 2 or 3 on electric stove), Cover with a foil and close the lid tightly on top, so the steam doesn't escape.
~ Leave it on the heat for about 15 min.
~ Switch off the heat and leave it for another 5 minutes.
~ Once open check if all the water has soaked in, if not, keep it for another 5 minutes. Mine was done properly by this time.
~ Enjoy this delightful dish with a cool raita on the side.


Check out my previous blog hop entries
This is off to Radhika’s blog hop event.


Related Posts Plugin for WordPress, Blogger...