Showing posts with label Vegetarian. Show all posts
Wednesday, July 30, 2014
Ambo Upkari/ Spicy Mango Curry
This one is one of the classic Konkani dishes. Mango upkari is very simple to make and a very few ingredients. If cooking with fruit is not your thing, try this and you would want to do it over and over again. My kiddos took some time to warm up to upkari, but me and my hubby love this. So usually we both finish it up without forcing the kids too much. :o)
Prep time: 15 min | Cooking Time: 15 min | Serves: 5
Ingredients:
Small Mangos - 3
Water - 2 Cups
Salt - 1tsp.
Green Chilies - 3
Jaggery - small lime size
All Purpose Flour / Maida - 2 tsp.
For tempering
Oil - 1 tsp.
Mustard seeds - 1 tsp.
Urad Dal - 1 tsp.
Kadipatta/ Curry Leaves - 1 spring
Red Chili - 1
Method of Preparation:
~ Wash and clean the mangoes. Peel the skin off and put skin in a large bowl. Keep peeled mangoes aside.
~ Now add the water to the bowl with skin. Using hands gently rub the inside part of the skin. Discard the squeezed skin. Now you will have a bowlful of thick mango water.
~ In thick bottomed wide pan, add this mango squeezed water, mango (you can cut the side slices off or use the whole mango), salt, green chili and jaggery. Place it on the gas and let it cook for about 5 to 7 minutes, turning the mangoes once half way through. Mango color changes to lighter color at this point of time.
~ In a small bowl, place AP flour and add 2 tablespoons of water. Mix them to make a fine paste.
~ Now slowly add it the cooked mixture. Combine gently and let the flour cook. The curry starts to thicken, then it's time to switch off the heat.
~ In a tempering spoon, heat some oil and let mustard seeds splutter.
~ Add urad dal, curry leaves and broken red chili, remove from heat and immediately temper on top of the mango curry.
~ Serve it hot with rice or as a side dish with roti's.
If you like to cook with fruits, you might also like:
Ambo Sasam/ Sweet and Spicy Mango CurryCorn Mango saladMango MousseMango Fruit Salad
Linking the recipe to HearthAndSoulBlogHop, ProjectInspired, TurnItUpTuesday, AnythingGoes, RecipeOfTheWeek, ShareYourStuff, DareToShare, TryANewRecipe, BragAboutIt, DIYSunday,FridayFrenzy, HappinessIsHomemade, WeekendRetreat, ShareItSunday, MeltInYourMouthMonday, What'dYouDoThisWeekend, MuchAdoAboutMonday, FiveFridayFinds,
Friday, June 27, 2014
Classic Margherita Pizza
This is one of the basic pizza recipe that I had seen on Youtube and over the period I have many variations of it. But in it's simplicity Margherita pizza is exquisite. It's very simple to put together and tastes absolutely delicious. My kiddos love pizza and am sure most of the kiddos do. Try this one at home and see how easy it is to impress them.
Prep Time: 15 min | Cooking Time: 10 mins/ pizza | Resting time: 1 hr | Serves: 4 (Makes two pies)
Ingredients:
For pizza base:
Whole wheat flour - 2 Cups
Salt - 1/2 tsp.
Brown Sugar (optional) - 2 tsp.
Chili Flakes (optional) - 1 tsp.
Warm water - 1 Cup
Dry Active Yeast - 1 tbsp.
For pizza topping:
Pizza Sauce - 1 Cup
Parmesan Cheese - 1/2 Cup
Olive Oil - 2 tbsp.
Fresh Basil leaves - handful
Fresh Mozzarella Cheese - 8 oz
Method of Preparation:
~ Add yeast to the warm water and let it sit for 10 min.
~ In a wide bowl add the flour, salt and optional brown sugar & chili flakes. Add the yeast mix to this and gently mix it to make a pliable dough.
~ Now slowly knead while you stretch and pull the dough.
~ Make two portions of the dough, cover them with a damp cloth and let it rest for half an hour to one hour.
~ When you are ready to make the pizzas, preheat the oven to 450 deg Fahrenheit and leave the pizza stone in there.
~ Flour the surface and work with each portion of the dough to make it into about 8 to 9 inch pizza base. Keep the edges little thicker.
~ Top the two pizzas with sauce, Parmesan cheese, olive oil, fresh basil leaves and mozzarella cheese in that order.
~ Transfer pizzas to the hot pizza stone (Careful!!!!). Bake for 10 minutes, cut and enjoy steaming hot pizza slices.
Note:
1. If you do not have pizza stone, no worries, any cookie sheet or pizza sheet will work too. Bake for 15 minutes on the pizza pan.
2. Fresh ingredients such as mozzarella and basil enhances the flavors tremendously.
Linking this to:
BakeFest#32, SaturdayNightFever, MyFavoriteThings
Wednesday, June 11, 2014
Suran Sukke/ Elephant Foot Yam Subzi
Did the name "Elephant Foot Yam" catch your attention? :o) Yeah, pretty neat name for this tuber. We call it "Churna" in konkani or "Suvarna Gadde" in Kannada. These tubers are quite huge and my mom would buy the cut pieces or the whole. Then we would end up eating them for several days in form of several dishes. It has several medicinal values is what I have heard and it's quite popularly used in Ayurveda medicine.
You have to be careful though while using this tuber. If you don't cook it right, it leaves a little scratchy feeling in your throat. My mom would actually wash them thoroughly, cut and add pieces in salt water for few minutes. In the recipes she would add more sore taste, either with tangy tamarind or tomatoes or lemon juice.
Suran - 3 Cups (I use frozen cut pieces)
Onion - 1 medium (finely chopped)
Garlic - 3 pods (finely chopped)
Tomato - 2 medium
Chili Powder - 1 tsp.
Turmeric Powder - 1/4 tsp.
Garam Masala Powder - 1/2 tsp.
Shredded Coconut - 1 Cup
Oil - 1 tbsp
Salt to taste
Method of Preparation:
~ Heat oil in a thick bottomed vessel. Add cut onion and garlic. Fry until onion becomes translucent.
~ Add turmeric powder, chili powder and fry for few minutes.
~ Add Suran and continue to fry. Cover and cook them for 7 to 10 minutes.
~ Add cut tomatoes and fry until they are cooked.
~ Add shredded coconut, Garam masala powder and salt to taste. Mix everything for few more minutes until everything is combined.
~ Serve hot with rotis.
Linking this recipe to
HearthAndSoulBlogHop, ProjectInspired, TurnItUpTuesday, AnythingGoes, RecipeOfTheWeek, ShareYourStuff, CreativeCorner, DareToShare, TryANewRecipe, BragAboutIt, DIYSunday,FridayFrenzy, HappinessIsHomemade, WeekendRetreat, ShareItSunday, MeltInYourMouthMonday, What'dYouDoThisWeekend, MuchAdoAboutMonday, FiveFridayFinds,
Friday, May 30, 2014
Beetroot Raita/ Beets in yogurt sauce
Yes! They are PINK! Really bright pink. Every time I make this my daughter gushes about the color. Beets are known to be good for eyes, lowering blood pressure and increasing stamina. I often steam them, add a little salt and snack on them. This particular cool raita is not only pleasing to eyes, they are very tasty and filling. Do try them from your regular cucumber raita.
Prep Time: 10 min | Serves : 4 (as side)
Ingredients:
Yogurt - 1 and 1/2 Cup
Salt - 1/4 tsp.
Sugar - 1 pinch
For tempering:
Oil - 2 tsp.
Mustard seeds - 1/2 tsp.
Urad Daal/ Split black gram daal - 1 tsp.
Hing/ Asafoetida - 1 pinch
Dry Red Chili - 1 (broken into two piece)
Method of Preparation:
~ Wash and peel the skin of beet. Grate them into a large bowl. Yes, your hand will look like you are bleeding! But don't worry, continue.
~ In another small bowl, beat yogurt with a spoon. Add in salt and sugar. Mix them thoroughly.
~ Heat oil in a small pan, add mustard seeds.
~ Once it starts to splutter, add in urad daal, hing and red chili. Remove from heat and immediately pour it on the grated beetroot.
~ Add the beaten yogurt and mix them.
~ Serve it with Rice Pulav.
You might also be interested in:
Cucumber Raita
Grated Cucumber Raita
Red Spinach Pomegranate Pulav
Coriander Pulav
Tomato Rice
Afghani Chicken Pulav
Lemon Rice
Beetroot Upkari
Beetroot Chutney
Linking this recipe to
HearthAndSoulBlogHop, ProjectInspired, TurnItUpTuesday, AnythingGoes, RecipeOfTheWeek, ShareYourStuff, CreativeCorner, DareToShare, TryANewRecipe, BragAboutIt, DIYSunday,FridayFrenzy, HappinessIsHomemade, WeekendRetreat, ShareItSunday, MeltInYourMouthMonday, What'dYouDoThisWeekend, MuchAdoAboutMonday, FiveFridayFinds,
Tuesday, April 29, 2014
Red Spinach Pomegranate Rice Pilaf/ Pulav
This iron rich vegetable can be used to make variety of dishes. Regular stir-fry or add in the dal curry, it always gives a nice aromatic taste. My mom would buy these fresh from the vegetable vendors who would come on his bicycle, and shout all the green vegetables names on top of his voice, so everyone in the neighborhood could hear him. They were usually really fresh and mom would end up buying whole lot than needed. But she would always end up using them. My love of greens comes from being used to so many greens all the time being cooked at home.
This particular variety of red spinach was rare to find in mid-west. But here I see them in abundance. I see a big fresh bunch at the grocers and I go for it. These have red stems and also red at the edge where the stem meets leaf. When added to the rice, it not only enhances the flavors, it gives a natural red color to the rice. Some of these are my tactics to get my kids introduced to as many vegetables as I can. :o)
Prep Time: 20 min | Cooking Time: 15 min | Serves: Family of 4
Ingredients:
Cooked Rice (Preferably cold/ left over) - 3 Cups
Onion - 1 large (chopped)
Tomato - 1 large (chopped)
Garlic - 3 pods (chopped)
Soy Sauce - 1 tbsp.
Fish Sauce (optional) - 2 tsp.
Sriracha Chili Sauce - 1 tsp.
Salt to taste (1/2 tsp.)
Sesame oil - 2 tsp.
Pomegranate seeds - 1 Cup
Method of Preparation:
~ Wash and rinse the greens. Soak it in cold water for atleast 10 minutes for all the dirt to settle down.
~ Once cleaned, chop them fine and keep it aside.
~ In a wide pan, heat sesame oil, add chopped onion and garlic. Cook them until onion is translucent.
~ Add tomato and red spinach, fry for few minutes and add all three sauces.
~ Once tomato is cooked, add salt and rice. Mix them all evenly. Now add half of the pomegranate seeds and give a quick mix and switch off the heat.
~ Serve it topped with remaining pomegranate.
Linking this recipe to
HearthAndSoulBlogHop, ProjectInspired, TurnItUpTuesday, AnythingGoes, RecipeOfTheWeek, ShareYourStuff, CreativeCorner, DareToShare, TryANewRecipe, BragAboutIt, FoodFriday, FavoriteThings, FridayFrenzy, HappinessIsHomemade, WeekendRetreat, ShareItSunday, MeltInYourMouthMonday, What'dYouDoThisWeekend, MuchAdoAboutMonday, TuesdayTalent
Wednesday, April 23, 2014
Bhendi Subzi/ Okra Stirfry
Bhendi/ Okra/ Ladies Finger is a vegetable that you either completely hate it or you love it. Luckily my kiddos like it as much as us, so I make variety of dishes with it. Okra is has same nutrition as kiwi it seems! It goes in regular curry, special sweet and sour curry, stuffed kind and then this simple subzi or stirfry. And as I am writing this, I realized that I don't have a single Okra recipe on my blog. That's strange considering I do buy okra pretty regularly and never had probably thought of clicking pictures to actually post. This particular dish is my mom's recipe.
Now one thing you have to be careful with this vegetable is that when you wash and cut, HAVE to make sure that it's dry. Yes, completely dry. My older sister had told me that first time she made this dish, and she didn't now about drying. So she cut them immediately after washing it. Later all they had was one big blob of slimy stuff. So when you wash it, make sure to pat them dry (really dry) with a towel. I usually wash and lay them down on towel, let them hang out for about 10 minutes and then pat dry. Just cut the top off and you are good to start chopping.
Prep Time: 20 min | Cooking Time: 20 min | Serves: 6
Ingredients:
Onion - large, chopped
Mustard seeds - 1 tsp.
Urid daal/ Split black gram - 1 tsp.
Garlic - 4 pods, crushed and chopped
Chili Powder - 1 tsp.
Garam masala - 1/2 tsp.
Tomato - 2 large, cubedGrated Coconut (optional) - 2 tbsp.
Salt - to taste (About 1 tsp.)
Oil - 1 tbsp.
Method of Preparation:
~ Chop the completely dried okra and keep it aside.
~ In a wide pan or kadai, heat oil and add mustard seeds. Once it splutters, add the urid daal.
~ Now add garlic, fry for few seconds and add the chopped onion. Add a pinch of salt and fry until onion turns translucent.
~ Keep the heat to medium high and add okra. Now keep frying until bhendi looses it's sliminess and is almost cooked.
~ Add chili powder, garam masala powder and tomatoes. Keep mixing them all until tomatoes are done.
~ Adjust the salt (remember we already added to onion) and sprinkle fresh grated coconut if using.
~ Mix and serve them hot with rotis or as a side for a rice.
Note:
- Buying guide: When choosing Okra make sure they are lighter green and smaller in size. If you could hold and break the tip, it should easily do so. The young okra pods are tasty and they cook fast. Once they are left too long to mature on the plant, they are hard to cut and cook.
Linking this recipe to,
HearthAndSoulBlogHop, ProjectInspired, TurnItUpTuesday, AnythingGoes, RecipeOfTheWeek, ShareYourStuff, CreativeCorner, DareToShare, TryANewRecipe, BragAboutIt, FoodFriday, FavoriteThings, FridayFrenzy, HappinessIsHomemade, WeekendRetreat, ShareItSunday, MeltInYourMouthMonday, What'dYouDoThisWeekend, MuchAdoAboutMonday, TuesdayTalent
Monday, March 31, 2014
Roasted Brussel Sprouts
Initially when I discovered how great brussel sprouts are in terms of nutritional values, I was excited and wanted to try. Well I have to admit my attempts were failed miserably. I realized, I tried to "Indianize" it by using some of our spices. So I went and got it again to try. This time I let it sit little longer in the refrigerator, that brought out it's STRONG smell out. Which put me off before I could even try cooking with it. I swore off against buying them and wasting.
Down the line, again I wanted to give them a try. This time I kept it simple and did these roasted brussel sprouts! Oh My. We are all converts now at home. These are not only beautiful to look, it's crunchy from outside and soft inside. The benefits of brussel sprouts are outstanding. They are high in Vitamin K and C and tons of beneficial vitamins and minerals. To read more on the benefits visit here. I wanted to share my experience with you all, to give you a sense of what to expect with Brussel sprouts. Also, never give up on trying out new veggies. :o)
Prep Time: 5 min | Cooking Time: 25 min | Serves : 4
Brussel Sprout - 1 Pound
Garlic - 3 or 4 cloves, chopped fine.
Olive Oil - 1 tsp.
Salt - 3/4 tsp.
Pepper - 1/2 tsp, fresh ground
Lime Juice - 1/2 tsp.
Method of Preparation:
~ Preheat the oven to 350 deg Fahrenheit.
~ Wash and chop brussel sprouts into half.
~ In a large bowl mix olive oil, salt and pepper. Toss the brussel sprouts in it.
~ Line a cookie sheet with foil, spray lightly and arrange the brussel sprouts on it.
~ Bake for 20 min. in the oven.
~ Take out toss with garlic and continue to bake for another 5 min.
~ Transfer to serving bowl and squirt the lime juice on top and toss.
Sending this to Hearth And Soul Blog Hop, Favorites event @MaNiche, BakeFest#29 @VersatileRecipes, ProjectInspired, TurnItUpTuesday, In&OutOfTheKitchen, AnythingGoes, RecipeOfTheWeek, ShareYourStuff, CreativeCorner, DareToShare, TryANewRecipe, HeartsForHome, DIYSunday, BragAboutIt, FoodFriday, PinWorthyProjects, Sweet&Savory, FavoriteThings, FridayFrenzy, Showlicious, SaturdayNightFever, HappinessIsHomemade, ShareItSunday, MeltInYourMouthMonday, What'dYouDoThisWeekend, MuchAdoAboutMonday, TryANewRecipe, TastyTuesday, ChefInTraining, TheYuckStopsHere
Thursday, March 13, 2014
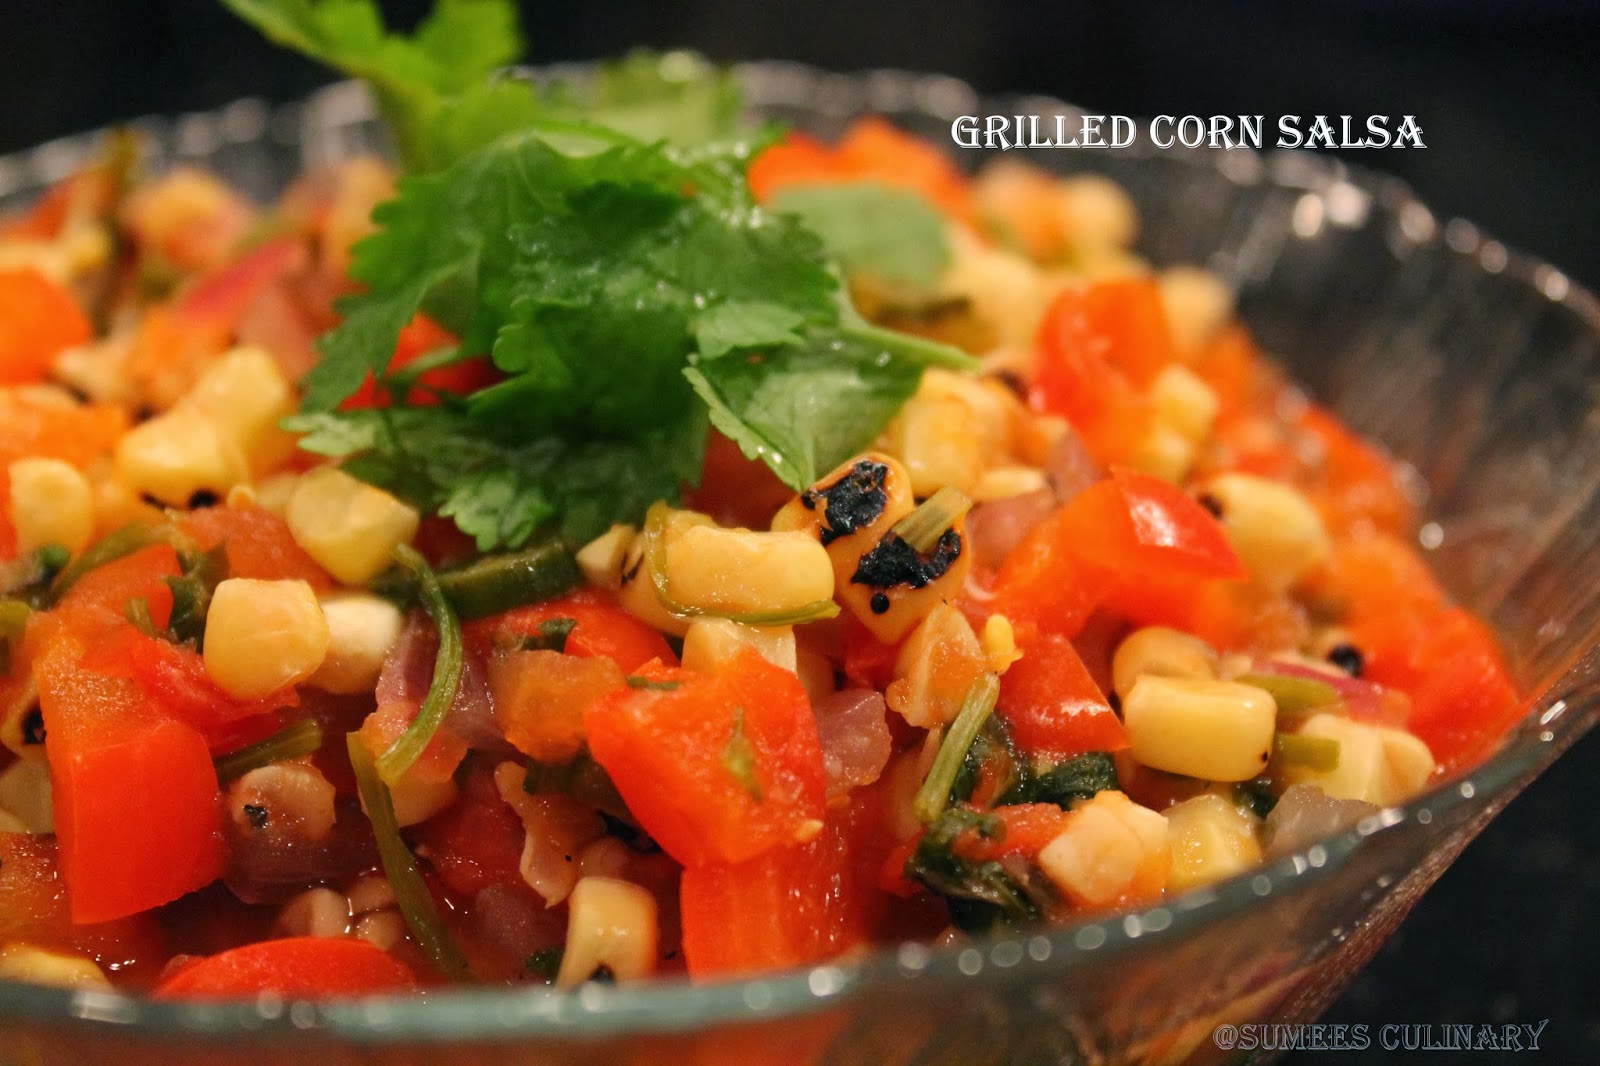
Grilled Corn Salsa
Corn always reminds me of warm summer evenings. Grilling and chatting away with friends in the backyard. Hopefully those days are coming soon. Meanwhile, thought will share one of my favorite corn salsa recipes. It's super simple, yet D.E.L.I.C.I.O.U.S!
It's also versatile. You can use it to scoop with chips, or top it on any of your favorite mexican dishes.
Ingredients:
Hot green pepper/ Green Chili - 1
Onion - 1 small
Tomato - 2 medium
Colored Bell Pepper - 1 small
Garlic - 3 big cloves
Coriander Leaves - big handful
Salt to taste
Sugar - a pinch
Method of Preparation:
~ Mix all the ingredients and stir well to combine.
You might be interested in
How to Grill Corn on the Cob
Friday, March 7, 2014
Methi Matar Malai
Methi Matar Malai is a punjabi dish which is mostly served at all the restaurants. It's rich and creamy, along side it has healthy methi/ fenugreek leaves and peas. It's very easy to serve up the same goodness at home for a fraction of the cost though. I bring Methi leaves once in two weeks. Add it in parathas, daal or make subzi out of it. This is one of my kids favorite since it's so creamy. I usually serve them with Roti/ Chapati's or Rice.
Prep Time: 15 min | Cooking Time: 25 min| Serves : 4
Ingredients:
Peas/ Matar - 1 1/2 Cup
Cumin Powder - 1 tsp.
Fresh Cream (Heavy Cream) - 1 Cup
Water - 1 Cup
Salt to taste
Sugar - 1 tsp.
Oil (or Ghee) - 2 tsp.
For Masala -
Onion - 1 large
Green Chilies - 3
Ginger - Lemon Size
Garlic - 3 pods
Cashew nuts - 1/2 Cup
Method of Preparation:
~ Wash Fenugreek leaves thoroughly under running water and place it in colander. Then in a big vessel, fill up water and soak the colander with leaves for at-least 10 mins.
~ While your greens are getting a water bath, grind everything under masala to a fine paste.
~ Microwave or boil the peas and keep that ready.
~ When you take out the colander with greens, you can see all the dirt in the green has sunk to bottom of the big vessel. Chop the leaves fine and keep it aside.
~ In a wide kadai, heat oil. Add the ground paste and cumin powder. Keep mixing so it's not burnt. Fry the masala until it starts to leave the sides.
~ Add hopped fenugreek leaves. Add a cup of water and mix them all well.
~ After 3 to 4 minutes, add the boiled peas, salt and sugar. Bring them all to a boil.
~ Reduce the heat and add the fresh cream. Mix the cream gently and let it simmer for 5 minutes and switch off the heat.
~ Serve Methi Matar Malai with chapati's.
Wednesday, February 26, 2014
Cranberry Pecan Kale Salad
Here is the story of how I ended up getting Dino Kale home. I usually buy just a bunch of regular kale. You know, the curly leaves kind! So I was at Whole Foods one day and when I went by the greens, there was an old man stocking up. He was blocking the kale that I wanted. Before I could open my mouth, he asked me if I wanted Dino Kale. I said, no just regular. Curiously I told him that I have never tried dino kale. He got excited to explain to me all about Dino Kale. So pretty much what I write below is what I heard from him. Now Dino Kale is the kale that I buy regularly.
Dino Kale or Lacinato Kale are wide leaves and not curly but flat. They are less tart than the original ones. When you want to use them, trim the bottom stem part and place it in water, like you would do with flowers or cilantro or parsley. These leaves perk up and looks as fresh as out of farm in about half an hour.
The best part of these kale is my kids love it too. Dino name gave them a kick in the first place. Since they are less tart they happily finished it off. Pecans well they pick them and give it to us.
Prep Time: 15 min | Serves: 4
* Serving Size: 1 Heaping Cup | Calories: 160 | Carbs: 20 | Fat: 10 | Protein: 3 | Sugar: 10 | Sodium: 31
Lacinato/ Dino Kale - 1 big bunch
Dried Cranberries - 1/2 Cup
Pecans - 1/3 Cup
Salt - 1/4 tsp.
Pepper (freshly grounded) - 1/4 tsp.
Lemon Juice - 1 tbsp.
Lemon zest - 1/2 tsp.
Olive Oil - 1 tbsp.
Method of Preparation:
~ Wash the Kale under running water for few minutes. Fill a large bowl with water and let the kale soak in there for few more minutes. Any dirt in the will settle below.
~ Take them out and dry it out in salad spinner or just lay them out on towel for few minutes.
~ Chop them coarsely and put it in a serving bowl.
~ In another small bowl, mix cranberries with lemon juice and it's zest.
~ Mix this with the chopped greens, along with all other ingredients, salt, pepper and pecans. Lastly pour olive oil and mix them all gently.
~ To serve this cold, cover and chill for half an hour in the refrigerator.
Notes:
~ You can use any kinds of greens you like.
~ Parmesan or Feta Cheese works wonderfully with this combination. I tend to skip coz not all are cheese lovers at our home. So we put as much as we individually want.
* Disclaimer: Nutrition fact is based on ingredients that I have used and is an approximate. It is calculated using Recipe Nutrition Calculator from a health website.
Friday, February 21, 2014
Mashed Sweet Potato
Mashed potatoes are a staple food over here in US. We like mashed sweet potatoes or yams better than the white potatoes. It's much more flavorful I think. Don't get me wrong. I LOVE potatoes, ask anyone in my family. But somehow mashed potatoes never interested me enough. Potatoes need some more perking up with added butter or cheese or sour cream. Sweet potatoes, just boiled also tastes so good and they are high in fiber and Vitamin A. So here is a simple recipe for mashed sweet potato that I do.
Prep Time: 10 min | Cooking Time: 15 min | Serves: 6
Cubed Sweet Potatoes - About heaped 3 cups
Milk - 2 Cups
Salt - 1/2 tsp.
Pepper - 1 tsp.
Cayenne Pepper (optional) - 1/2 tsp.
Paprika - 1 tsp.
Dry Parsley - 1 tsp.
Method of Preparation:
~ Add milk and sweet potatoes in a wide pan and bring the milk to boil. Keep a check, so it doesn't burn the bottom.
~ Check with a fork if sweet potatoes are done after about 10 min. Once the sweet potatoes are cooked add all other remaining ingredients. Using a potato masher, slowly mash all the sweet potatoes to combine.
~ Serve it warm.
Wednesday, January 29, 2014
Poori/ Fried Indian Flatbread
Poori who doesn't love this. This soft puffy looking are a delight for my kids. Though I don't do it very often, just because it's deep fried, I do it for festive occasions or when my kids asks for it. I hadn't had a chance to take pictures, since the minute hot ones comes out, kiddos want it. When some of my friends asked me to post this recipe, I took these pictures. So here you go on the recipe.
Ingredients:
Whole Wheat Flour - 2 Cups
Suji Rava/ Fine Semolina - 1 tsp. (optional)
Water - About 1 Cup
Hot Water - 1/2 Cup
Oil - 1 tbsp.
Salt - 1 tsp.
Vegetable oil to deep fry the pooris
Method of Preparation:
~ Take wheat flour, suji and salt in a wide mixing bowl.
~ Add hot water and carefully mix the water into dough. You can use spoon to mix at this stage so that you won't burn your hand.
~ Now start adding the regular water slowly until it comes together as pliable dough.
~ Add one tbsp. of oil and start kneading properly. You can use kneading blade and do it this in food processor too. Once you have smooth dough, make lime size balls.
~ While you are kneading, heat oil for deep frying.
~ Roll the dough balls into medium thickness circle.
~ Check the temperature of the oil, by dropping in a small pinched piece of dough. If it rises up immediately that means you are ready to roll and start deep frying.
~ Drop one poori (be very CAREFUL and gentle with hot oil) at a time in the oil. Using slotted ladle gently touch the top of the poori. This makes the poori to puff up.
~ Once a nice brown color has formed on the bottom side, flip the poori to the other side and fry for few seconds.
~ Using the slotted ladle take the poori out onto a paper towel to soak up any excess oil.
~ Serve them hot. The best combination to serve these pooris are Batate Song (a konkani style potato curry) or Vegetable Kurma. Pictured above with Batate Song and Tofu Spinach Stir-fry
Notes:
~ Do not let the dough sit, once kneading. Start making the pooris right away.
~ If the dough is rolled out too thin, it won't puff up properly.
~ Make sure to hold the poori down in the oil with the slotted spoon for few seconds. This makes the poori to puff up.
You might also be interested in -
Vegetable Kurma
Tofu Spinach Stir-fry
Sunday, December 15, 2013
Cabbage Paratha/ Patta Gobi Parantha/ Cabbage Tortillas
Parantha's are easy way to get vegetables into kids diet. Though my kids love cabbage subzi, they love the paranthas even more. I do these parantha's in a different way than doing filling of the paratha and then rolling out. I mix them all up which makes the rolling easier. Also I quick stir fry the vegetables, so they are cooked right along with the parantha.
Prep Time: 20 min | Cooking Time: 30 min | Serves: 4 to 6
Ingredients:
Cabbage (Shredded) - 2 Cups
Red Chili Powder - 1 tsp.
Ajwain - 1/2 tsp
Sauf/ Fennel seeds - 1/2 tsp.
Green Chili - 2 finely chopped
Grated Ginger - 1 tsp.
Salt - 1 tsp.
Oil - 1 tbsp.
Whole Wheat Flour/ Multi-grain Flour - 3 Cups
Water
Coriander Leaves (optional) - 1 tbsp chopped fine
Method of Preparation:
~ In a small pan heat oil, add fennel seeds, ajwain and green chilies. Once a nice aroma comes, add in onion, ginger, cabbage and red chili powder. Saute for 5 minutes. Add salt and remove from heat. Let this cool for 5 minutes.
~ Place flour in a wide mouthed pan, add in the cabbage mixture, coriander leaves and knead the dough. Add water as required to make dough consistency. Cover with a moist towel and let it sit for few minutes.
~ Now heat a frying pan. Make small lemon size ball of the dough mixture, dust the rolling surface with flour, roll the dough ball out using a rolling pin make round tortillas/ paranthas. Gently transfer this to the frying pan.
~ Fry one side for half a minute, flip over and let it cook all the way for a minute. Now apply little oil on top and flip over to finish cooking on first side. Remove and serve it hot with yogurt and pickle.
Thursday, November 14, 2013
Karathe Kismuri/ Hagalkaayi Kosumbari/ Bitter Gourd Relish
Karathe or Bitter Gourd is extremely bitter if you try to eat it as is. It is considered to be very good for diabetic patients. And today happens to be World Diabetics Day! When I was looking to see if there were any scientific proof about bitter gourd reducing the blood glucose levels, I stumbled across this link. Didn't know there was a website dedicated to bitter gourd.
My mom would make variety of dishes using karathe and this is one of the relish that she would make. Being part of Konkani group reminding me all these dishes that my mom would serve us. Me and my hubby loved karathe since childhood and I see the same trend in my son. He just loves any variations of bitter gourd. You can adjust the jaggery as per your taste. If you can handle the bitterness then more power to you and less to jaggery. :o)
Prep Time: 20 min | Cooking Time: 10 min| Serves: 4
Ingredients:
Bitter Gourd - 2 medium
Oil - 1 tbsp.
Jaggery - 1 tbsp.
Turmeric Powder - 1/4 tsp.
Chili Powder - 1 tsp.
Grated Coconut - 1 Cup
Coriander Powder - 1/2 tsp.
Onion - 1 small finely chopped.
Coriander Leaves - half a handful
Salt to taste
Method of Preparation:
~ Wash and scrape off bitter gourd skin. Cut it lengthwise and de-seed. Chop them in small pieces, add salt and leave it for few minutes.
~ Heat oil in a pan, squeeze the bitter gourd a little to take out the moisture and add it to the hot pan.
~ Shallow fry until they are almost done. This needs patience since you have to keep it on medium heat and keep frying. Now add haldi/ turmeric powder and jaggery. Give it a nice mix and take it out of heat. Allow to cool for few minutes
~ In a bowl add onion, chili powder, coriander powder and little salt. Nicely mix them together. It turns out good when you squeeze everything together and mix with hand (yeah, I said it.. magic of hand mixing)
~ Add in freshly grated coconut, chopped coriander leaves and fried bitter gourd pieces. Mix it all up and serve on the side with Plain Rice and Daali Thoy.
You may be also interested in Bitter Gourd Subzi
Sending this dish to Nandoo's event Dish it out - Coconut & Salt
Wednesday, November 6, 2013
Arugula Salad Pizza
One fine day when I switched on Food Network, saw Ree of Pioneer Woman cook a Fresh Herb Pizza. It looked exactly like the one that I had fortnight ago at a family owned pizza place. And that weekend, our friend who picks up their fresh produce from a farm where they have membership, dropped some salad greens. Stars must have aligned right, so it was a sign, and I made this beautiful looking pizza. It was an instant hit with my family. Other than younger one, who despises any green fresh thing on her food, all of us devoured it. I left half of the pizza uncovered for her and she loved every bit of it. And I am not kidding when I say all of us over ate. BTW just noticed that this is my first post with yeast. Yes! I am not afraid anymore to use yeast in my recipes.
Prep Time: 15 min | Inactive Time: 1 Hour | Cooking Time: 15 min | Serves: 4
Recipe Based on: Fresh Herb Pizza
Ingredients:
Pizza Base -
Multi-grain Flour/ AP Flour - 2 Cups
Active Dry Yeast - 1 tsp.
Warm Water - 1 Cup
Salt - 1/2 tsp.
Pepper - 1/4 tsp. Freshly ground
Light Olive Oil - 1/4 Cup
Olive Oil for drizzling - 1 tbsp.
Pizza Sauce - 1 Cup
Shredded Cheese - 1 Cup
Salad Topping -
Arugula - 1 Bunch
Pomegranate seeds - 1 tbsp.
Salt
Pepper
Lemon Juice - 1 tsp.
Olive Oil - 1 tsp.
Method of Preparation:
~ Add yeast into the warm water and let it sit for 5 minutes.
~ Meanwhile, add some salt and pepper in the flour. Mix in olive oil and combine well. Now slowly add the yeast mixture and mix until just combined.
~ Add 1 tbsp. of olive oil and just roll the dough lightly, cover the container and leave it to rise for atleast an hour in a warm place.
~ When ready to make the pizza, preheat the oven to 500 deg Fahrenheit.
~ Take out the pizza dough cover, punch the dough lightly and start rolling it out. Drizzle little oil on the pizza stone or pizza pan or sheet, and transfer the rolled out pizza on to this.
~ Top the pizza base with pizza sauce and shredded cheese
~ Bake this for 15 minutes on the bottom rack, or until the crust is golden brown.
~ Toss all the ingredients together for the salad. Top the pizza with salad and serve it.
Notes:
~ You can use different types of greens salad. Sky is the limit as to what you want to top it or what kind of salad.
~ Or can just have pizza with just sauce and cheese.
~ Store bought pizza sauce can be used or even ketchup would suffice.
~ Can serve it topped with Parmesan cheese.
Sending this yummy pizza to Vardhini's Bake Fest event
Wednesday, October 23, 2013
Vaali Ambat/ Basale Soppu Curry/ Malabar Spinach Curry
I have previously shared Vaali Ani Sungat Randhyi that uses Malabar Spinach and Shrimp as the main ingredients. This is another Konkani delicacy that's very common to most households. Many have the vine growing in their backyard, so that whenever they want they can just go over and bring in the fresh produce and use it. I can never make up my mind if I like the vegetarian or non-veg version better. Try both and let me know your view. :o)
Prep Time: 15 min | Cooking Time: 30 min | Serves : 6
Recipe Courtesy: My Aayi
Ingredients:
Vaali/ Basale Soppu/ Malabar Spinach - 1 bunch (About 4 Cups)
Split Red Gram/ Tuvar Dal - 1/2 Cup
Onion - 1 medium size
Tomato - 1 medium size
Turmeric Powder - 1/4 tsp.
Salt - 2 tsp.
For grinding Masala:
Grated Coconut - 2 Cups
Red Chili - 4
Coriander Powder - 2 tsp.
Mustard Seeds - 1 tsp.
Garlic - 2 pods
Method of preparation:
~ Wash Dal, add a cup of water along with chopped Onion and Tomato. Add turmeric powder and pressure cook for three whistles.
~ While the pressure cooker is cooling down, prepare the masala. Grind everything under the grinding masala list to a fine paste while adding a cup of water in intervals.
~ Wash Vaali thoroughly with water. Chop them coarsely.
~ In a wide, heavy bottomed pan cook the greens first.
~ Once it starts to wilt and change to darker green color, add the ground masala.
~ Let the mixture bring to a boil.
~ Mash the contents in the pressure cooker and add it to the pan. Add enough water as required.
~ Add salt to taste and mix them all together. Bring the curry to a boil and switch off the heat.
~ Serve it hot with plain white rice.
Subscribe to:
Posts (Atom)