Pages

Tuesday, September 27, 2011

Pineapple Gojju / Menaskai/ Pachadi

It's a blog hop day. This is my third time in this series. I had to blog hop Rinku's Kitchen Treats. Rinku is from Kerala and has an enchanting collection of recipes. It was a pleasure going through her space. It's filled with colorful images of the dishes. It's a feast to eyes. Picking what to cook was a challenge in itself. After shortlisting 5 or so, I wanted to try something authentic Kerala cuisine. But one of my favorite pineapple gojju made the cut. My mom makes this often using mangoes/ pineapples during festivals and it's gone in jiffy. This is commonly made during festivals and weddings in B'lore. I did not make much changes to her recipe since I wanted to see how it turns out. Note to self - should sometime post our konkani style recipe too. Below recipe turned almost close to taste as we do it. Do try out this simple recipe.


Serves: 4 | Prep Time: 10 min. | Cooking Time: 20 ~ 30 min.


Ingredients:

  • Pineapple pieces - 2 cups
  • Tamarind - 1/2 tsp. extract
  • Chili powder - 2 tsp.
  • Turmeric powder - 1/2 tsp.
  • Jaggery - 2 tbsp full
  • Grated Coconut - 1 cup
  • Green Chilies - 2
  • Oil - 1 tsp.
  • Mustard seeds - 1 tsp.
  • Red chilies - 2
  • Curry leaves - 7 to 10 leaves
  • Salt to taste


  •  Method of Preparation:

    ~ Grind coconut and green chilies to make a fine paste.
    ~ In a heavy bottomed pan, add tamarind extract with half a cup of water and bring it to boil.
    ~ Add chili powder, pineapple pieces and salt. Stir and cook for 5 minutes. Cover and cook for another 2 min.
    ~ Now add coconut paste, jaggery and continue to cook until it masala thickens. Once done remove from heat, prepare the seasoning and pour it on top & close the lid.
    ~ For seasoning, heat oil in a small pan, add mustard seeds. Once it splutters, add red chilies and curry leaves.


    ~ Note that if you let it sit for some hours and reheat to serve, it tastes even better, since the fruit pulls in all the spices.


     This is off to Radhika's Blog Hopping event


    And to Nayna's Flavours of South India

     to MMK series Vrat ka Khana by Kalyani

    Update: Sending this to Richa's F for Fruit Curries event via Charitha.


    Sunday, September 25, 2011

    Kande Bhaaji/ Onion Bhaaji

    Kando or Onion is such a staple vegetable that everyone will have it in their pantry. Aayi would sometime prepare this when she was on time crunch. Today I made this coz that is all I had it my pantry. The simple ingredient list and the ease of preparation will make you want to try this recipe.
    Serves: 4 | Prep. Time: 5 min. | Cooking Time: 10 min.

    Ingredients:
    ·         Onions – 5 (About 3 cups when cut)
    ·         Tomato – 4 (About 2 cups when cut)
    ·         Garlic – 4 cloves (cut into strips)
    ·         Turmeric powder – ½ tsp.
    ·         Chili powder – 1 tsp.
    ·         Coriander / Dhaniya powder – ½ tsp.
    ·         Cumin / Jeera powder – ½ tsp.
    ·         Oil – 1 tsp.
    ·         Salt to taste
    Method of Preparation:
    ~ Peel the onions and slit them into thin strips.
    ~ Wash and cut the tomatoes into thin strips.
    ~ Heat oil in a cooking pan and add onions and garlic.

    ~ Cook on high heat until onion starts to turn translucent. The idea on high heat is so that onion doesn’t leave water and stays crunchy.
    ~ Reduce the heat and add turmeric, cumin, coriander and chili powder. Mix them well.
    ~ Add tomatoes and increase the heat again to cook the tomatoes.

    ~ Add salt and switch off the heat once tomatoes are done.
    ~ Bhaaji can be served with Chapati, puris or Lime Rice.

    Thursday, September 22, 2011

    Aloo Papdi Chaat

    Papdi chaat is great comfort food. I had a different kind of presentation of papdi chaat at my friend Shweta’s house a few years back. Instead of serving in bowls, she had separately arranged each flat puris. I liked that idea since it can be served as an appetizer. Whenever I have made trays of this, it’s gone in minutes at parties.
    Serves: 10 | Prep Time: 20 min. | Cooking Time: for potatoes
    Ingredients:
    ·         Flat puris – 1 packet (Contains about 50 to 60 puris, available in Indian stores)
    ·         Thin Sev – 1½ cup
    ·         Onion – 1 cup (thinly chopped)
    ·         Tomato – 1 cup (thinly chopped)
    ·         Potatoes – 2 cups (Boiled, peeled and cubed)
    ·         Green Chutney – 2 tbsp.
    ·         Tamarind Chutney – 2 tbsp.
    ·         Coriander leaves to garnish.
    ·         Thick yogurt – ½ cup
    ·         Chaat Masala Powder – ½ tsp.
    ·         Red Chili powder – ½ tsp.
    ·         Salt to taste for yogurt
    Method of Preparation:
    ~  Add Chaat masala, Chili powder and salt to yogurt and mix them.
    ~  Arrange flat puris in a tray.
    ~  Now top all the puris with tiny bits of potato and then Onion.
    ~  Spoon over little bit of yogurt mixture on each and then put green and tarmarind chutney on top.

    Almost ready to top it off with Sev
    ~  Now add tomatoes. Garnish the generously with sev and some coriander leaves.
    ~  This will easily stay up to 4 hours (if not over by then) without getting soggy.


    Sending this is Ayeesha's Anyone can cook series.


    Sunday, September 18, 2011

    Ginger Shrimp

    I was getting ready to make shrimp with coconut one day and looked around at the Karahi chicken that I had made with coconut milk. So suddenly I decided to keep the shrimp light and go with whatever comes to my mind. It turned out to be a classic one, with unbelievable taste. I just loved the sauce that came out with it. Next time I am making this to top it on pasta!
    Serves: 4 | Prep Time: 15 min. | Cooking Time: 15 min.

    Ingredients:
    ·         Shrimp (uncooked) – 30 count
    ·         Onion – 1 medium – cut into thin strips
    ·         Ginger – 1 tbsp. full – Thinly cut into long sticks
    ·         Green Chili – 3 – slit
    ·         Curry Leaves – 10 to 12
    ·         Turmeric powder – ½ tsp.
    ·         Dry Basil – 1 tsp.
    ·         Salt to taste
    ·         Oil – 1 tbsp.

    Method of Preparation:
    ~ Wash and clean the shrimps. De-shelve, de-vein and clean it with water. Drain and keep aside.
    ~ Heat the oil in a pan. Once it’s hot, add green chilies and ginger.
    ~ Sauté for some time and add the curry leaves.
    ~ Now add onion and sauté until translucent. 
    ~ Add clean shrimp, salt and cook them until they start to turn pink (about 5 to 7 minutes).
    ~ Now add Turmeric powder and dried basil. Continue to cook for another 5 minutes and switch off the heat.
    ~ Enjoy just as a side or with rice or with some pasta. No matter how you decide to eat, you will dig into this flavorful dish. :o)


    Sending this to Srav's What's for Friday Dinner? event
    

    Wednesday, September 14, 2011

    Spicy Potato Gravy

    This is my second week in Blog hopping. Week one was a great experience and relished on the outcome of coconut pistachio burfi. This week I am paired with Pinky of Pink's Recipe Diary. She is a newbie in blogging just like me. After going through her blog, I was not able to make up my mind between Hara bhara kabob and Aloo rasedar. Since aloo rasedar was one of the early posts that doesn't usually get the love it deserves, that dish made the cut. On top of it there was no picture of the dish, so it gave me a challenge to create my own. I made some changes and made it more dryer version. You could add more water for thinner gravy. For original recipe visit here.

      
    Ingredients:
    • Potato – 4 Big ones (Peeled, cubed, soaked in water)
    • Tomato – 3 (About 1 1/2 cup - Coarsely chopped)
    • Onion – 1 (About 3/4 cup - Coarsely chopped)
    • Ginger and Garlic Paste – 1 Tsp.
    • Turmeric - 1/2 tsp.
    • Jeera – 1/2 tsp.
    • Red Chili powder - 1 1/2 tsp.
    • Coriander powder - 1/2 tsp.
    • Cumin powder - 1/2 tsp.
    • Garam masala - 1 tsp.
    • Salt to taste
    • Oil – 2tbsp
    • Coriander Leaves - 2 tbsp. chopped


    Method of Preparation:

    ~ Grind onion and tomatoes in a food processor and keep it aside.
    ~ In a heavy bottomed pan, heat oil. Add jeera, ginger and garlic.
    ~ After sauteing for half a minute, add turmeric, red chili powder. Now add the onion, tomato paste and fry them in oil for 5 minutes.
    ~ Add remaining dry masalas( coriander, cumin and garam masala) and continue to cook (About 10 minutes).
    ~ Once oil starts to separate from the masala, drain the water from potatoes and add it to the gravy. Add 1/2 cup of water. Add salt and mix throughly.
    ~ Now cover the pan and cook for another 15 to 20 minutes on a low flame. Keep stirring inbetween to make sure it doesn't burn at the bottom.
    ~ Once potatoes are done, add coriander leaves give it a stir and switch off the gas.
    ~ Serve it hot with puris, rotis or jeera rice.


    For more information on blog hopping visit Radhika's Tickling Palates.

    Monday, September 12, 2011

    Kala Chana Usli

    Growing up whenever I used to go to temple for special pujas I used to look forward for prasad that they would give. I grew up in Bangalore and for Ganesh Chaturthi, they would usually have chana usli or puliyogare. Both were yummy treats to end the fasting. :o)

    My mom would often make kala chana usli at home too. I frequently make this at home and more so often to take it to temple for Shivaji’s puja, since this recipe doesn’t use onion or garlic. I try and make a small dish before I head out temple, so I can offer it to God & also other devotees would in turn relish on the Prasad.
    Kala chana usli is very quick to make. It can be used as a dry side dish with lunch.
    Serves: 4 | Prep Time: 5 min. | Cooking Time: 20 min.
    Ingredients:
    ·         Kala Chana – 2 cups
    ·         Oil – 1 tbsp.
    ·         Mustard seeds – 1 tsp.
    ·         Hing / Asafetida – a pinch
    ·         Jeera seeds – 1 tbsp.
    ·         Green Chilies – 3 finely chopped
    ·         Kadipatta – About 10 leaves
    ·         Coconut – 2 tbsp.
    ·         Coriander leaves – 1 tbsp. to garnish
    ·         Lime juice – 1 tbsp.
    ·         Salt to taste


    Method of Preparation:
    ~ Wash chana and drain the water. Keep it soaked for half an hour (if possible. Otherwise just let it cook little longer)
    ~ In a pressure cooker add the chana with water 1 inch above it. Add some salt. Pressure cook high (with whistle on) for about 15 minutes or for 3 whistles. Chana shouldn’t be too soft like we would do for chole. It needs to be just enough cooked.
    ~ Let it cool and once you are able to handle the cooker, drain the excess water using a colander.
    ~ In a pan, heat oil and add mustard seeds. Once it starts to crackle, add hing, jeera, green chilies and kadipatta. Give it a mix and add Kala Chana.
    ~ Add very little salt (since we already added while cooking chana), Lime juice and coconut.
    ~ Switch off the heat and garnish with coriander leaves.


    This dish just happens to be so versatile that I am sending them to all the below events. Check them out.
    Cathy's MLLA event vis Susan's lineup.

    Nayna's Flavours of South event.

    Sreevalli's My Favorite Dish event


    Kalyani's Vrat Ka Khana event


    Friday, September 9, 2011

    Zucchini Subzi / Stir Fried Zucchini

    Initially when I saw Zucchini at the grocery stores, I wasn’t sure what kind of vegetable it was. I tried zucchini at a stir fry place and really liked the crunchy taste of it. After that I usually buy zucchini to use it in baked vegetables. Below recipe is what I made once when I didn’t have anything but Zucchini in the refrigerator and needed to add a side dish to our dinner. It is very quick, easy and flavorful.


    Wednesday, September 7, 2011

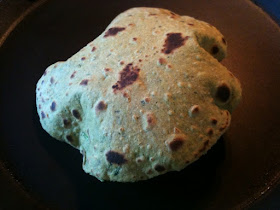
    Methi Paratha

    Yesterday had bought some Fresh Methi or Fenugreek leaves from Indian store. I had to make chapatis for the night, so decided to make methi paratha’s instead of doing chapathi and methi ki subzi.:o)


    Fenugreek leaves are very nutritious. Type 2 Diabetic people usually take the powder every day in the morning which studies have found to reduce their blood sugar level. They are good for balancing cholesterol, acid reflex, lactation for new mothers and minor stomach pains. My kitchen is always loaded with methi seeds/ powder/ dried kasoori methi to add to the dishes.


    So let’s get started on these delicious paratha’s
    Makes: About 30 to 35 | Prep Time: 20 min. | Cooking Time: 20 min. to 30 min.

    Ingredients:
    ·    Fenugreek / Methi leaves – 1 or 2 bunch (When chopped should be about 2 cups)
    ·    Whole wheat/ Multi Grain Flour – 3 cups
    ·    Whole Wheat flour – 1 cup of dusting and rolling the paratha’s
    ·    Chili Powder – 2 tsp.
    ·    Turmeric Powder – ½ tsp.
    ·    Jeera seeds – 1 tsp.
    ·    Ajwain / Carom seeds – 1 tsp.
    ·    Garlic – 2 cloves
    ·    Oil – 3 tbsp.
    ·    Salt to taste
    ·    Water – As required

    Method of Preparation:

    ~ Trim and clean the leaves thoroughly. Drain the excess water and finely chop them. (Since I use food processor, I coarsely chop them, coz the food processor chops them finely for me.J )
    ~ Scrub the Jeera and Ajwain seeds on your palm to release the nice aroma. Mix all the ingredients together in food processor except water and dusting flour.


    ~ Switch on the processor and slowly add water from top. Once it all comes together, switch off and take out the beautiful green colored dough.

    ~ Make lemon size balls out of the dough. Roll them in the dusting flour kept separate.


    ~ Roll the paratha gently into a circle, making sure the thickness is same throughout.


    ~ Heat a non-stick pan. Put rolled out paratha on the pan and cook for ¼ of a minute. Then flip it over to cook on the other side. Cook on this side (about 1/2 minute) completely. Flip it over to continue to cook on the side that you put on first by gently pressing on the edges with paper towel or soft cloth or even the spatula.


    ~ Take out paratha in a hot case or on a paper towel lined plate. Cover it.

    ~ Continue the process to make all the parathas.
    ~ To serve, top it with a slice of butter or spoon of ghee. Serve with fresh yogurt and spicy pickles. They will just melt in your mouth!


    Tips:
    -     I make the dough in food processor, so I start making the chapatis immediately. If you are mixing by hand, I would say, keep it covered for half an hour before you start.
    -     Follow the cooking method for Paratha that I have described above. My eldest sister Vidya taught me that. This cooking by flipping only two sides always makes softest chapathi and parathas.
    -     To save remaining chapati’s or paratha’s – Keep them covered and let it cool for some time. Then, wrap them first in a paper towel and then in a foil. Put it in the fridge. To thaw, take out the required amount of chapatis. Wrap two to four chapati’s in a paper towel and microwave for 30 seconds on medium high. If you not sure how high your microwave is, try only 15 to 20 seconds first. If you microwave the chapati’s for too long, it will become very hard like papad. :o)
    -     I usually never put oil for Chapati’s, since I make chapati’s/ paratha’s ahead of time and save it.

    Sending this to Shilpa's Life is Green event